This article contains the FS300 Series Ninja Slushi™ Professional Frozen Drink Maker FAQs. This supports the following models: FS301, FS301PK, FS301OR, FS301MG, FS301TG, FS301C, FS305CO and FS299.
Assembly / Disassembly
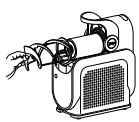
How do I assemble the unit?
- Ensure all parts are fully cleaned and the motor base is level on a flat, solid surface.
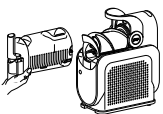
- Install the condensation catch under the evaporator by sliding it into the rail grooves.

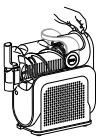
- Install the auger by sliding it over the evaporator and rotating until it fits into place onto the pin.

- With the bail handle up, slide the vessel over the installed auger and evaporator.
- Lock the vessel in place by pushing the bail handle back to seal the vessel.
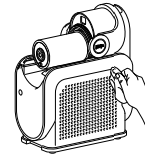
- Insert the drip tray in front of the motor base until it clicks in place.

How do I install and remove the condensation catch?
Install the condensation catch under the evaporator by sliding it into the rail grooves. To remove, gently slide the condensation catch out of the unit, since there may be residual liquid in the condensation catch.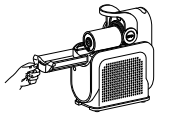
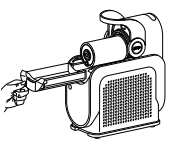
How do I install and remove the auger?
Install the auger by sliding it over the evaporator and rotating until it fits into place onto the pin. To remove, slide the auger off the evaporator.
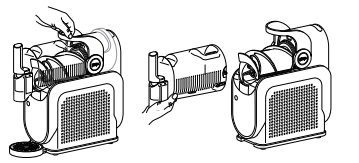
How do I install and remove the vessel?
With the bail handle up, slide the vessel over the installed auger and evaporator to install. Unlock the bail handle by pulling forward and remove the vessel by gently pulling it off the unit. Ensure the vessel is tipped downward to prevent remaining liquid from spilling out the back of the vessel.
How do I install and remove the drip tray?
Insert the drip tray in front of the motor base until it clicks in place. To remove, gently pull and lift from the motor base.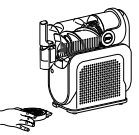
Is the evaporator removable?
No, the evaporator is not removable. It is attached to the motor base.
Where can I store the drip tray when not in use?
Store the drip tray on the left side of the unit by hanging it in place.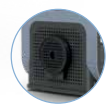
How do I disassemble the unit?
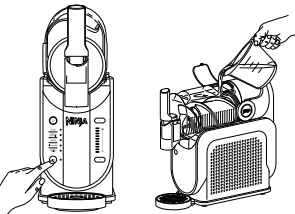
- Unlock the bail handle by pulling forward and remove the vessel by gently pulling it off the unit. Ensure the vessel is tipped downward to prevent remaining liquid from spilling out the back of the vessel. Set aside.

- Slide the auger off the evaporator. Set aside.

- Gently slide the condensation catch out of the unit, since there may be residual liquid in the condensation catch. Set aside.
- If needed, remove the drip tray and/or spout shroud to clean.
How to Operate / Tips & Tricks
How do I use the unit?
- Make sure the unit has been sitting upright on the countertop for at least 2 hours before first use, so the refrigerant can settle in the condenser for optimal and safe use.
- Plug the unit in.
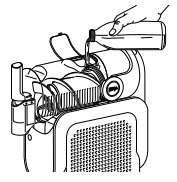
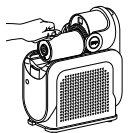
- Open the cover on the top of the vessel.
- Add liquid(s) and/or blending ingredients through the easy-fill port and close the cover.
- Press the power button to turn the unit on.
- Choose your desired preset.
- The preset will start at the default/optimal temperature for ideal texture. If desired, adjust the temperature for your perfect frozen drink texture.

- Temperature Control Setting LEDs will pulse while frozen drink is freezing to your set temperature level. Once frozen drink reaches the desired temperature, unit will beep three times. Unit will continue running to keep your frozen drink at the ideal temperature and be ready to dispense.
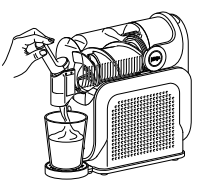
- Place a cup on the drip tray, under the handle.
- To dispense, slowly pull the handle. To stop, release the handle back in place.
- Enjoy your latest frozen drink creation!
What are the presets?
3-5 unique presets that use RapidChill Technology to determine the perfect temperature for the ideal frozen drink.
- Slush
- Spiked Slush
- Milkshake
- Frappé*
- Frozen Juice*
*FS301/FS301C only
What is the Slush preset used for?
Designed for transforming your everyday beverages. Recipe examples include soda and lemonade.
What is the Spiked Slush preset used for?
Designed for beverages with alcohol content. Recipe examples include margarita and rosé.

What is the Frappé preset used for?
Designed for coffee shop lovers to make frozen treats. Recipe examples include store-bought frappé.
What is the Milkshake preset used for?
Designed for dairy- and creamier-based beverages. Recipe examples include chocolate milk, and blended milkshake.

What is the Frozen Juice preset used for?
Designed for naturally sweetened beverages. Recipe examples include orange juice and apple cider.
How do I start a preset?
Simply press the preset to start, once the unit is powered on. The preset will start at the default/optimal temperature for ideal texture.
How do I stop a preset?
Press the power button to turn off the unit.
What is RapidChill Technology?
The unique presets included on the control panel use RapidChill Technology to determine the perfect temperature for your ideal frozen drink. Your recipe is rotated 360 degrees around a chilling cylinder, also known as the evaporator, to maintain the ideal temperature and texture.
What is the Rinse Cycle?
This cycle agitates, without cooling, to rinse the unit.
What is the Temperature Control Setting?
The Temperature Control Setting is used to adjust the temperature for your ideal texture. Each preset will start at a default/optimal temperature for ideal texture. If desired, adjust the temperature for your perfect frozen drink texture. There are 10 temperature levels total.
How do I use the Temperature Control Setting?
- The Temperature Control Setting lets you customize the result to be thicker or thinner than the preset.
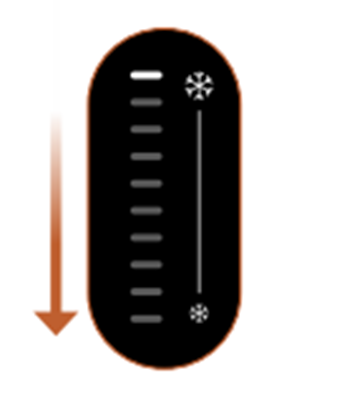
- For sippable frozen drinks, decrease the temperature level by pressing the bottom arrow on the control panel.

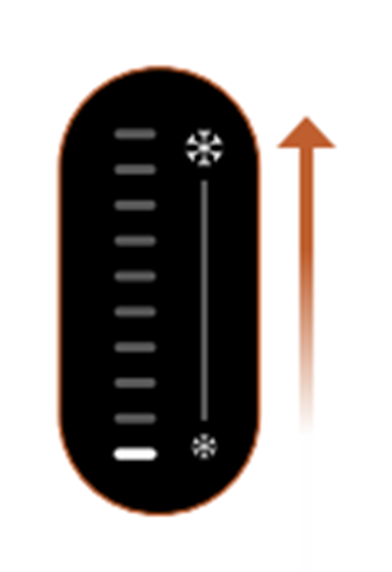
- For thicker, colder frozen drinks, increase the temperature level by pressing the top arrow on the control panel.

What if my recipe is not slushing?
If your recipe has not reached desired texture after 60 minutes, increase the temperature by one level.
Wait 10-15 minutes to test recipe texture. If still not desired, increase by one level again. Repeat until desired texture is achieved.

What temperature will the Slush preset default to?
Each preset will start at a default/optimal temperature for ideal texture. The Slush preset will start at temperature level of 3 out of 10.
What temperature will the Spiked Slush preset default to?
Each preset will start at a default/optimal temperature for ideal texture. The Spiked Slush preset will start at temperature level of 9 out of 10.
What temperature will the Frappé preset default to?
Each preset will start at a default/optimal temperature for ideal texture. The Frappé preset will start at temperature level of 2 out of 10.
What temperature will the Milkshake preset default to?
Each preset will start at a default/optimal temperature for ideal texture. The Milkshake preset will start at temperature level of 5 out of 10.
What temperature will the Frozen Juice preset default to?
Each preset will start at a default/optimal temperature for ideal texture. The Frozen Juice preset will start at temperature level of 1 out of 10.
How long will it take for my frozen drink to be ready?
Frozen drinks will be ready in 60 minutes or less. Creating drinks can take up to 15–60 minutes depending on ingredients, volume, and starting temperature.
When will I know my frozen drink is ready?
Temperature Control Setting LEDs will pulse while frozen drink is freezing to your set temperature level. Once frozen drink reaches the desired temperature, unit will beep three times. Unit will continue running to keep your frozen drink at the ideal temperature and be ready to dispense.
Is there a minimum amount required?
Yes, minimum input is 2 cups or 16 oz.
Is there a maximum amount limit?
Yes, maximum input is:
- 6 cups or 48 oz for FS300
- 8 cups or 64 oz for FS301/FS301C
Why do I need to keep the unit upright for 2 hours before first use?
Place the unit on countertop for at least 2 hours before operating. This allows the refrigerant to settle in the condenser for optimal and safe use.
Can I add hot ingredients?
No, DO NOT add hot ingredients.
Can I add solid ingredients?
No, DO NOT add ice or solid ingredients like fruit, ice cream, or frozen fruit.
Is this unit like a blender?
This is NOT a blender. DO NOT process a solid block of ice or ice cubes. DO NOT make a smoothie or process hard, loose ingredients. DO NOT attempt to blend or macerate non-liquid ingredients.
Do I need to chill liquid(s) before adding to the unit?
For best results, chill liquid(s) or blended ingredients before adding to the unit.
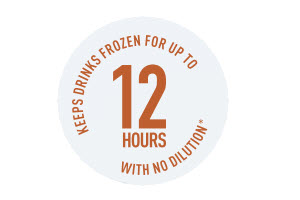
How long can I run the unit?
Up to 12 hours of runtime for frozen drinks on tap. The unit will continue running to keep your drinks at the ideal temperature, prevent them from freezing solid, and be ready to dispense when your craving hits.
How do I have the best dispense experience?
For the best dispensing experience, fill the unit to the max-fill line (48 oz on FS300 / 64oz on FS301 and FS301C).
How do I avoid a foamy output?
When using the Milkshake or Frappé* preset, dispense contents within 30 minutes of the preset ending to avoid a foamy output.
*Frappé preset only available on FS301 / FS301C
How do I prevent the output melting after dispensing?
For the frostiest results, chill serving glasses before dispensing your frozen drink.
How do I dispense?
To dispense, slowly pull the handle. To stop, release the handle back in place. Stopping the unit also stops the auger and cooling process. You will need to keep the unit running to dispense contents.
How do I know if the vessel is attached properly?
If the vessel is not installed correctly, the unit will detect it and provide an alert. All preset LEDs will flash. With the bail handle up, slide the vessel over the installed auger and evaporator. Lock the vessel in place by pushing the bail handle back to seal the vessel. Press the Power button to turn unit on, and the preset LEDs will illuminate, indicating the unit is ready for use.
How do I store the unit?
For cord storage, wrap cord with the hook-and-loop fastener near the back of the motor base. DO NOT wrap the cord around the bottom of the base. Store the unit upright and store all parts assembled. Store the drip tray on the left side of the unit by hanging it in place. When moving the unit, lift from the bottom of the motor base. DO NOT store ingredients inside the vessel.
How do I open the box?
Remove the color box from the brown master box. Cut the straps around the color box. Remove the straps and lift the color box top cover straight up to unbox your unit.
Sugar Requirements
How much sugar is required in my recipe?
All inputs must contain at least 4% sugar. Refer to drink/liquid nutrition label to ensure sugar content meets the recommended minimums below:

Why is there a sugar requirement?
Too little sugar will prevent proper freezing of a slush output.
How do I tell if my recipe has enough sugar?
If the sugar content of the input is too low, the unit will detect it and provide an alert. Temperature Control LEDs will flash one at a time in descending order starting with the top LED, preset LEDS will flash, and the unit will beep twice every minute for 15 minutes.
What do I do if my recipe does not meet the minimum requirements for total sugar?
If a drink does not meet minimum requirements of total sugar: Add 1–2 tablespoons flavored syrup, juice, sugar, date sugar, coconut sugar, maple syrup, agave, simple syrup, or honey per serving. Combine additional sugar with the base prior to pouring in unit. Reset the unit by pressing the preset. Restart by pressing the preset again.
Can I use sugar-free substitutes?
Sugar-free or low-sugar liquids won’t slush because they need at least 4% sugar for the right texture.
A few alternatives that can be used are :
- Coconut Sugar
- Maple Syrup
- Agave Syrup
- Simple Syrup
- Honey
Note:
- Allulose is an alternative that can help slush but may make it sweeter.
- You could also add natural sugars found in juices or make a spiked drink.
- Experiment and enjoy your slushy creations!
Alcohol Guidelines
How much alcohol can I use in my recipe?
When using the SPIKED SLUSH preset, all premade inputs (wine, beer, etc.) must between 2.8% and 16% alcohol.
Why is there an alcohol limit?
Too much alcohol will prevent proper freezing of a slush output.
How do I tell how much alcohol I can use in my mixed cocktails, before I add to the unit?
To create frozen cocktails, see chart below for the maximum hard alcohol/spirit (vodka, tequila, etc.) content per total recipe size
.
What do I do if my recipe exceeds the maximum requirements for alcohol amount?
If the alcohol content of the input is too high, the unit will detect it and provide an alert. Temperature Control LEDs will flash one at a time in ascending order starting with the bottom LED, and the unit will beep twice every minute for 15 minutes.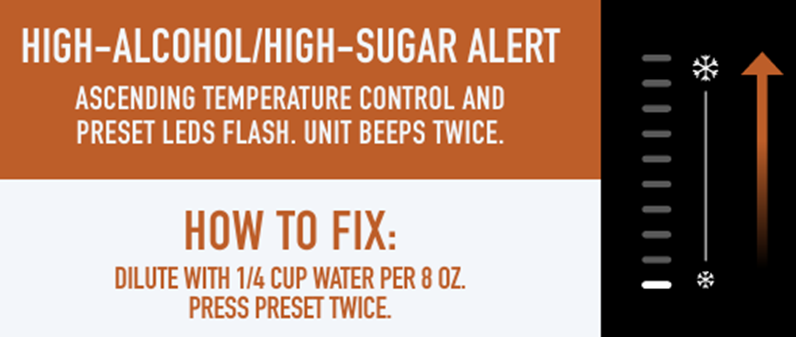
What ABV (Alcohol by Volume) % can I use in drinks I add to the unit?
When using the SPIKED SLUSH preset, all premade inputs (wine, beer, etc.) must between 2.8% and 16% alcohol.
No Prep Slushis
What recipe is recommended for first use?
The kick starter recipes included in the Quick Start Guide are recommended for your first use. Two are included for your benefit. One is a kid friendly one-ingredient soda slush. The other is a frozen mango margarita.
What no prep drinks can I use for the Slush preset?
The following drinks are recommended for the Slush preset: sports drinks, energy drinks, soda, sweetened iced tea, kombucha, lemonade, limeade, and fruit punch.
What no prep drinks can I use for the Spiked Slush preset?
The following drinks are recommended for the Spiked Slush preset: hard seltzers, sour beers, hard kombucha, hard lemonade, premixed margaritas, hard tea, hard cider, wine, plus premixed canned paloma cocktails, Moscow mule cocktails, and rum & coke cocktails.
What no prep drinks can I use for the Frozen Juice preset?
The following drinks are recommended for the Frozen Juice preset: apple juice, apple cider, bottled pre-made smoothies, cranberry juice, orange juice, mango juice, pineapple juice, grape juice, cherry juice, watermelon juice, and tropical juice.
What no prep drinks can I use for the Frappé preset?
For the Frappé preset, please reference the Create Your Own Milkshake and Frappé Chart in the back of your Inspiration Guide. This chart includes recipes with syrup, milk powder, flavored milk, and store-bought coffee drinks.
What no prep drinks can I use for the Milkshake preset?
For the Milkshake preset, please reference the Create Your Own Milkshake and Frappé Chart in the back of your Inspiration Guide. This chart includes recipes with syrup, milk powder, flavored milk, and store-bought coffee drinks.
Cleaning and Maintenance
How do I clean the unit?
For best results, use the Rinse Cycle before disassembling and cleaning all parts to rinse frozen drink off the evaporator by following the steps below.
- Dispense any remaining frozen drink.
- Stop the current preset. Press the RINSE button.
- Add warm water up to the vessel’s max fill line.

- Slowly dispense the water from the unit immediately after filling. Ensure you use a large cup or bowl to capture the liquid.
- Stop Rinse cycle by pressing the RINSE button again.
- Press the power button to turn the unit off.
- If needed, repeat until frozen drink is rinsed off the evaporator.
Next, disassemble and wash all parts by hand or in a dishwasher to fully clean the unit after each use by following the steps below.
- Unlock the bail handle by pulling forward and remove the vessel by gently pulling it off the unit. Ensure the vessel is tipped downward to prevent remaining liquid from spilling out the back of the vessel. Set aside.
- Slide the auger off the evaporator. Set aside.

- Wipe down the evaporator with a sanitized or warm, damp cloth.
- Gently slide the condensation catch out of the unit, since there may be residual liquid in the catch. Set aside.

- Wipe down unit underneath the evaporator with a sanitized or warm, damp cloth.
- If needed, remove the drip tray and/or spout shroud.
- Hand-wash all parts in warm, soapy water, or use a dishwasher. All parts, except the motor base and evaporator, are bottom-rack dishwasher safe, and should NOT be cleaned with a heated dry cycle.
- Wipe down the motor base with a sanitized or warm, damp cloth.
Allow all parts to dry thoroughly before reassembling and/or storing the unit.
Are all parts dishwasher safe?
Yes, all parts, except the motor base and evaporator, are bottom-rack dishwasher safe, and should NOT be cleaned with a heated dry cycle.
How do I use the Rinse Cycle?
For best results, use the Rinse Cycle before disassembling and cleaning all parts to rinse frozen drink off the evaporator by following the steps below.
- Dispense any remaining frozen drink.
- Stop the current preset. Press the RINSE button.
- Add warm water up to the vessel’s max fill line.
- Slowly dispense the water from the unit immediately after filling. Ensure you use a large cup or bowl to capture the liquid.
- Stop Rinse cycle by pressing the RINSE button again.
- Press the power button to turn the unit off.
- If needed, repeat until frozen drink is rinsed off the evaporator.
- After using the Rinse cycle, wash all parts by hand or in a dishwasher to fully clean the unit after each use.
Do I need to use the Rinse Cycle?
It is recommended to use the Rinse Cycle after each use to rinse frozen drink off the evaporator for an easier and faster cleaning experience. This cycle agitates, without cooling, to rinse the unit.
How do I clean the spout area?
To fully clean the spout, remove the shroud and seal. Ensure parts are completely dry before reassembling and storing.
Is the seal behind the evaporator removable?
No, the seal behind the evaporator is not removable. It is secured in place to prevent leaking.
General Questions
Why are all the preset LEDs flashing?
If the vessel is not installed correctly, the unit will detect it and provide an alert. All preset LEDs will flash. Follow all steps below to correct the error.
- With the bail handle up, slide the vessel over the installed auger and evaporator.
- Lock the vessel in place by pushing the bail handle back to seal the vessel.
- Press the Power button to turn unit on, and the preset LEDs will illuminate, indicating the unit is ready for use.
Why are the Temperature Control LEDs flashing one at a time in DESCENDING order, starting with the top LED, the preset LEDS are flashing, and the unit is beeping twice every minute for 15 minutes?
If the sugar content of the input is too low, the unit will detect it and provide an alert. Temperature Control LEDs will flash one at a time in descending order starting with the top LED, preset LEDS will flash, and the unit will beep twice every minute for 15 minutes. Follow all steps below to correct the error.

- Check the sugar content in your recipe to ensure it contains at least 4% sugar.
- If using a premade beverage, check the ingredient list to ensure the sugar content is at least 4% and ensure the beverage doesn’t include artificial sweeteners. Refer to the Required Sugar Content section for more details.
- If a drink does not meet minimum requirements of total sugar, add 1–2 tablespoons flavored syrup, juice, sugar, date sugar, coconut sugar, maple syrup, agave, simple syrup, or honey per serving.
- Reset the unit by pressing the preset. Restart by pressing the preset again to resume creating your frozen drink.
Why are the Temperature Control LEDs flashing one at a time in ASCENDING order, starting with the top LED, the preset LEDS are flashing, and the unit is beeping twice every minute for 15 minutes?
If the alcohol content of the input is too high, the unit will detect it and provide an alert. Temperature Control LEDs will flash one at a time in ascending order starting with the bottom LED, and the unit will beep twice every minute for 15 minutes. Follow all steps below to correct the error.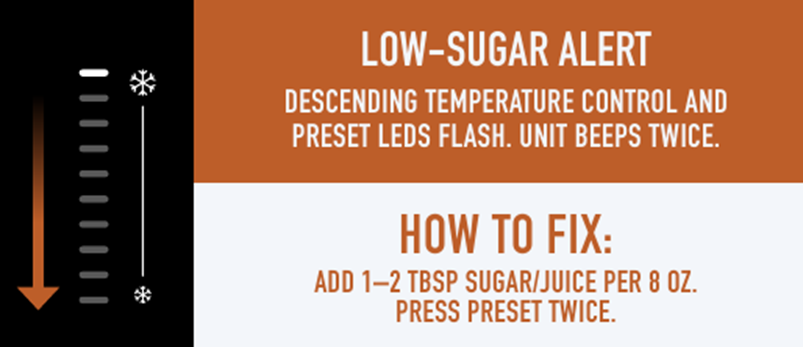
- Check the alcohol content in your recipe to ensure it contains between 2.8% and 16% alcohol.
- If using hard alcohol/spirits (35% +), use 4 oz for every 24 oz of total recipe size. Refer to the Alcohol Guidelines section for more details.
- If a drink exceeds the maximum alcohol amount, add 1/4 cup juice, water, non-alcoholic drink mix, soda, tonic water, seltzer, or coffee/tea per serving to dilute the input.
- Reset the unit by pressing the preset. Restart by pressing the preset again to resume creating your frozen drink.
Why are the Temperature Control LEDs flashing and the unit is beeping twice every minute for 15 minutes?
If the motor stalls while running, the unit will detect it and provide an alert. Every Temperature Control LED will flash, and the unit will beep twice every minute for 15 minutes. Follow all steps below to correct the error.
- This unit features a unique safety system that prevents damage to the motor and drive system should you inadvertently overload it. If the unit is overloaded, the motor will be temporarily disabled.
- Unplug the unit from the electrical outlet.
- Allow the unit to cool for approximately 15 minutes.
- Remove all parts and accessories. Ensure no ingredients are jamming the auger.
- Plug in the unit again and reassemble all parts to resume unit use.
Why are the top 5 and bottom 5 Temperature Control LEDs flashing alternatively and the unit is beeping twice every minute for 15 minutes?
If the unit is on its side during use, the unit will detect it and provide an alert. The top 5 and bottom 5 Temperature Control LEDs will flash alternately, and the unit will beep twice every minute for 15 minutes. Follow the step below to correct the error.
- Place the unit upright and let it stand for at least 2 hours before using.
Why are ever other Temperature Control LEDs flashing alternatively and the unit is beeping twice every minute for 15 minutes?
If the unit fails, the unit will detect it and provide an alert. Every other Temperature Control LED will flash alternately, and the unit will beep twice every minute for 15 minutes. Follow the step below to correct the error.
- If the unit fails, please call Customer Service.
Can I use my unit outside?
No, it is not recommended to use this unit outside. This unit is for indoor and household use only.
What do I do if my output is too thin?
Each preset will start at a default/optimal temperature for ideal texture. If desired, adjust the temperature for your perfect frozen drink texture. For thicker, colder frozen drinks, increase the temperature level by pressing the top arrow on the control panel.
What do I do if my output is too thick?
Each preset will start at a default/optimal temperature for ideal texture. If desired, adjust the temperature for your perfect frozen drink texture. For sippable frozen drinks, decrease the temperature level by pressing the bottom arrow on the control panel.
What do I do if my output is too icy?
Each preset will start at a default/optimal temperature for ideal texture. If desired, adjust the temperature for your perfect frozen drink texture. For sippable frozen drinks, decrease the temperature level by pressing the bottom arrow on the control panel. Too little sugar will prevent proper freezing of a slush output. All inputs must contain at least 4% sugar. Refer to drink/liquid nutrition label to ensure sugar content meets the recommended minimums below.
What do I do if my output is too foamy?
When making a dairy-based output, dispense contents within 30 minutes of the preset ending to avoid a foamy output. For best results, add 1 tablespoon of heavy cream per 16 oz prepared drink.
Can I store my unit next to other items?
No, DO NOT store items next to the unit. When using appliance, make sure both sides and back of it are at least four inches away from walls and other items.
Why are the sides of my unit warm?
The sides of the motor base have holes for ventilation. When using appliance, make sure both sides and back of it are at least four inches away from walls and other items to ensure proper air flow around the motor base.
Can I use my unit in a hot environment?
No, DO NOT use your unit in an environment over 100°F. This unit is for indoor and household use only.