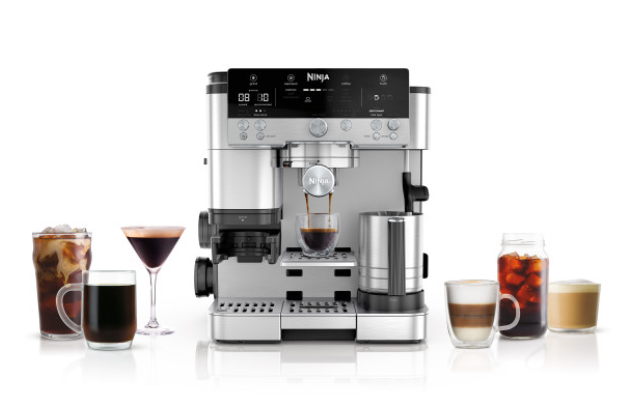
This article contains the FAQs for the ES600 Series Ninja® Luxe Café. This supports the following models: ES601, ES601BK, ES601BL, ES601GM and ES601C.
General Questions
How is Ninja Luxe Café different compared to other espresso machines in the market?
While many semi-automatic espresso machines come with standard features like a built-in Conical Burr Grinder, customizable grind sizes, 9-bar pressure brewing espresso, and PID temperature control, the Ninja Luxe Café stands out with its exclusive offerings.
Notably, it boasts drip coffee and cold brew capabilities, along with features like optimal grind size recommendations, weight-based dosing, and an assisted tamper and funnel for even distribution of grounds. Additionally, it accommodates travel mugs, provides hands-free frothing with pre-selected froth styles, and supports both dairy and plant-based milk frothing, including cold foam creation. These unique features collectively make the Ninja Luxe Café Premier Series a versatile and user-friendly option for crafting a variety of top-notch coffee beverages at home.
What are the key features and benefits of Ninja Luxe Café ?
The Ninja Luxe™ Café Premier Series offers the ultimate guided experience that makes espresso uncomplicated, making it easy to create café-quality drinks at home. Here are the key features and benefits:
- 3 Machines in 1
Brew a variety of beverages without the guesswork, including double or quad-shot espressos, classic, rich, or over-ice drip coffee, and cold-pressed espresso or cold brew coffee. Available in multiple sizes (6 to 18 oz.). - Barista Assist Technology™
Enjoy a guided experience with customized grind size recommendations, weight-based dosing, and automated adjustments for temperature and pressure, ensuring perfectly balanced flavors without any guesswork. - Integrated Grinder
The conical burr grinder features 25 settings for a fresh and precise grind, accommodating various drink options and bean types. - Weight-Based Dosing
The built-in scale provides accurate weight-based dosing for each drink, eliminating the need to manually weigh your grounds. - Hands-Free Frothing
The Dual Froth System creates perfectly textured microfoam for both dairy and plant-based milk, with four preset programs for steamed milk, thin froth, thick froth, and cold foam. - Temperature Settings
Choose from three brewing temperatures to suit different roasts: low-medium for dark roasts and medium-high for light roasts. - Flavorful Cold-Pressed Drinks
Brew espresso at lower temperatures and pressures for a smoother, more flavorful cold brew, ideal for drinks like espresso martinis. - Perfect Pucks
The assisted tamper ensures evenly distributed and compact grounds, creating ideal conditions for high-quality espresso shots. - Built-In Storage
Conveniently store the tamper, funnel, brew baskets, brush, and cleaning disc within the machine, keeping your workspace organized. - Complete Accessories
Includes a portafilter, milk jug, double basket, Luxe basket, assisted tamper, cleaning brush, cleaning disc, funnel, descaling powder, cleaning tablets, hard water testing kit, and instructions and inspiration guide.
These features make the Ninja Luxe™ Café Premier Series a versatile and user-friendly choice for brewing a wide range of high-quality coffee drinks at home.
Can Ninja Luxe Café accommodate different cup sizes?
Yes, the Ninja Luxe Café can accommodate up to an 8 inch travel mug.
Why are the semi-automated espresso machines great for home use?
The best type of espresso machine for home use depends on your preferences, skill level, and budget.
Semi-automatic espresso machines, such as Ninja Luxe Café, are great for home use because they offer coffee lovers a balance between control and convenience. They allow you to customize your coffee by adjusting factors like grind size, and water temperature, while still automating some of the more complex processes. This balance makes it possible to achieve high quality, barista-level espresso at home without extensive experience or skill. Additionally, they are generally more affordable and compact than fully automatic machines, making them a practical choice for home kitchens.
Why is there water in the machine out of box?
To ensure optimal performance we rigorously test each Ninja Luxe Café machine before it gets to you. All machines are cleaned after testing, but some water or grounds may still be present. If needed simply brush and wipe clean before use.
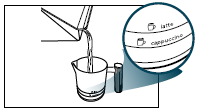
What types of café drinks can I brew with Ninja Luxe Café?
If you crave it, you can have it! Ninja Luxe Café offers an array of drink options.
With Ninja Luxe Café, you can brew double shots and quad shots of espresso, perfect for that extra kick. Plus, get creative and whip up your own espresso-based creations like lattes, cappuccinos, café au lait, and more!
Prefer drip coffee? Choose from classic, rich, or over-ice options.
If you're in the mood for something cold, we've got you covered with cold brew and cold-pressed options.
What is Barista Assist Technology™ ?
Barista Assist Technology™ offers the ultimate guided experience with customized grind size recommendations, weight-based dosing, and active brew adjustments for temperature & pressure for balanced flavor, delivering café-quality brews, no guesswork required.
- Grind size recommendations & adaptive brewing
Our espresso machine eliminates the endless guesswork of making espresso by monitoring your brew and continuously adjusting settings like grind size, pressure, and more. That means you can create the perfect cup with no guesswork required. - Built-in scale
Different drinks require different amounts of grounds. While other machines simply grind for a set amount of time, our built-in scale weighs out the perfect dose for your chosen drink. - Basket recognition
The machine automatically detects which basket you’re using and adjusts settings accordingly without you lifting a finger.
Does the Ninja Luxe Café come with an integrated tamper?
Ninja Luxe Café does not come with an integrated tamper. However, it does feature an assisted tamper that helps the user effortlessly create the perfect puck without any guesswork.
What is the warranty for Ninja Luxe Café ?
Ninja Luxe Café has a 1-year limited warranty.
Is the Ninja Luxe Café a manual, semi-automatic, or automatic espresso machine?
The Ninja Luxe Café is a Semi-Automatic Espresso Machine: This type of machine automates the water pressure and temperature but requires the user to grind, tamp, and start/stop the extraction process. It strikes a balance between control and convenience.
Can I use coffee capsules or pods with the Ninja Luxe Café?
No, you can not use coffee capsules or pods with the unit.
Does the Ninja Luxe Café dispense hot water?
No, there is no hot water dispenser in the Ninja Luxe Café.
Is a single basket compatible with the ES601?
No, the ES601 is not designed for single basket use.
Can I use puck screens with the Ninja Luxe Café?
The Ninja Luxe Café doesn't need a puck screen for brewing, however, most puck screens should be compatible with your unit. Please keep in mind that due to the variety of screens available in the market, some may work better than others with the Ninja Luxe Café.
Can I use coffee capsules or pods with the Ninja Luxe Café?
No, you can not use coffee capsules or pods with the unit.
Does the Ninja Luxe Café dispense hot water?
There is no hot water on the ES600 series.
Does the hot water for brewing ever come into contact with plastic?
After the reservoir, the water does not come into contact with any plastic.
Where can I store my accessories when they are not in use?
The machine features an onboard storage compartment on its right side, ideal for keeping your baskets, cleaning disk, and brush neatly stored when not in use. On the left side, the funnel and tamper can be securely stored in their designated slots. Additionally, the portafilter conveniently fits into the group head for easy access.
What is the drip tray capacity?
The drip tray can hold enough water to make 6 cappuccinos.
Brewing Questions
How do I brew an espresso?
Before brewing an espresso, it's essential to decide on the type of espresso shot you want and then choose the correct basket accordingly.
To brew an espresso drink with Ninja Luxe Café, follow the steps below:
- Set up
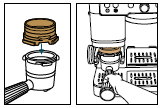
- Select basket based on drink choice. Line up tabs on basket with notches on portafilter and press down.
- Place funnel on portafilter, aligning the notches on the funnel with the notches on the portafilter. Push down until funnel locks into place in the portafilter.
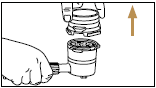
- Insert portafilter straight into grinding cradle, making sure it’s level and fits securely.
- Grind
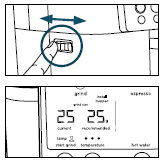
- Turn the center dial to select ESPRESSO. Use grind dial on left side of machine to match current grind size to recommended grind size.
- Press START GRIND.
- Tamp
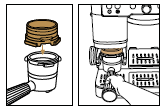
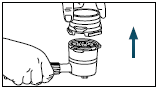
- With portafilter on a solid level surface, and with funnel still attached, press tamper all the way down until it meets the funnel.
- Remove funnel and store on left side of machine.
- With portafilter on a solid level surface, and with funnel still attached, press tamper all the way down until it meets the funnel.
- Brew
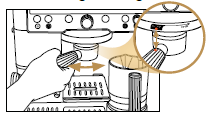
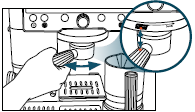
- Install portafilter into group head by aligning orange dots and twisting to the right.
- Place cup under portafilter.
- Press START BREW.
- When brewing is complete empty grounds into a knock box or container.
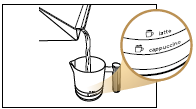
- Froth
- Fill milk jug to one of the recommended fill lines. DO NOT exceed the max line.
- Place milk jug on milk jug platform.
- Press MILK TYPE button based on the milk that is in the jug.
- Turn froth dial to select your froth type, then press START FROTH.
How do I make a Cappuccino with Ninja Luxe Café?
Brew Time: Approx. 2 minutes
Froth Time: Approx. 1 minute Servings: 1 (6½ oz.)
Difficulty: Beginner
Ingredients:
- Double shot espresso
- 5 ounces whole milk, chilled. Whole milk can be substituted with plant-based milk.
- Optional: You can add 1 tablespoon of your favorite syrup for flavor, e.g. vanilla, hazelnut.
- Insert the Basket
- Insert the double basket into the portafilter by lining up the tabs on the basket with the notches on the portafilter and press down.
- Place the funnel on the portafilter, aligning the notches on the funnel with the notches on the portafilter. Push down until the funnel locks into place.
- Install the portafilter into the grinding cradle, making sure it's level and fits securely.
- Grind the Coffee
- Turn the center dial until ESPRESSO is illuminated.
- Adjust the grind dial on the left side to match the current grind size to the recommended grind size.
- Press START GRIND.
- Tamp the Grounds
- Tamp the grounds by pressing the tamper all the way down until it meets the funnel.
- Remove the funnel and place portafilter in group head (angled to the left) by aligning orange dot on portafilter with orange dot on group head.
- Prepare the Cup
- Optional: Add the vanilla syrup to an 8-ounce cup and place it under the portafilter. If no syrup is used, just place the cup under the portafilter.
- Press START BREW.
- Prepare the Milk
- Add the milk to the milk jug, then place the jug on the milk jug platform with the steam wand inside.
- Froth the Milk
- Press the MILK TYPE button based on the milk in the jug – DAIRY or PLANT-BASED.
Turn the froth dial until THICK FROTH is illuminated. - Press START FROTH to begin frothing.
- Press the MILK TYPE button based on the milk in the jug – DAIRY or PLANT-BASED.
- Serve the Coffee
- Pour the frothed milk over the brewed espresso and serve.
How do I make a Latte Macchiato with Ninja Luxe Café?
Brew Time: Approx. 2 minutes
Froth Time: Approx. 1 minute
Servings: 1 (3½ oz.)
Difficulty: Beginner
Ingredients:
- Double shot espresso
- 2 ounces whole milk. Whole milk can be substituted with plant-based milk.
- Optional: You can add 1½ tablespoon of your favorite syrup for flavor, e.g. caramel.
- Insert the Basket
- Insert the double basket into the portafilter by lining up the tabs on the basket with the notches on the portafilter and press down.
- Place the funnel on the portafilter, aligning the notches on the funnel with the notches on the portafilter. Push down until the funnel locks into place.
- Install the portafilter into the grinding cradle, making sure it's level and fits securely.
- Grind the Coffee
- Turn the center dial until ESPRESSO is illuminated.
- Adjust the grind dial on the left side to match the current grind size to the recommended grind size.
- Press START GRIND.
- Tamp the Grounds
- Tamp the grounds by pressing the tamper all the way down until it meets the funnel.
- Remove the funnel and place portafilter in group head (angled to the left) by aligning orange dot on portafilter with orange dot on group head.
- Prepare the Cup
- Optional: Add the caramel syrup to a 6-ounce cup and place it under the portafilter. If no syrup is used, just place the cup under the portafilter.
- Press START BREW.
- Prepare the Milk
- Add the milk to the milk jug, then place the jug on the milk jug platform with the steam wand inside.
- Froth the Milk
- Press the MILK TYPE button based on the milk in the jug – DAIRY or PLANT BASED.
Turn the froth dial until THICK FROTH is illuminated. - Press START FROTH to begin frothing.
- Optional: Drizzle caramel syrup on top and serve.
- Press the MILK TYPE button based on the milk in the jug – DAIRY or PLANT BASED.
- Serve the Coffee
- Pour the frothed milk over the brewed espresso and serve.
How do I make a Flat White with Ninja Luxe Café?
Brew Time: Approx. 2 minutes
Froth Time: Approx. 1 minute
Servings: 1 (6½ oz.)
Difficulty: Beginner
Ingredients:
- Double shot espresso
- 5 ounces whole milk. Whole milk can be substituted with plant-based milk.
- Insert the Basket
- Insert the double basket into the portafilter by lining up the tabs on the basket with the notches on the portafilter and press down.
- Place the funnel on the portafilter, aligning the notches on the funnel with the notches on the portafilter. Push down until the funnel locks into place.
- Install the portafilter into the grinding cradle, making sure it's level and fits securely.
- Grind the Coffee
- Turn the center dial until ESPRESSO is illuminated.
- Adjust the grind dial on the left side to match the current grind size to the recommended grind size.
- Press START GRIND.
- Tamp the Grounds
- Tamp the grounds by pressing the tamper all the way down until it meets the funnel.
- Remove the funnel and place portafilter in group head (angled to the left) by aligning orange dot on portafilter with orange dot on group head.
- Prepare the Cup
- Place an 8-ounce cup under portafilter.
- Press START BREW.
- Prepare the Milk
- Add the milk to the milk jug, then place the jug on the milk jug platform with the steam wand inside.
- Froth the Milk
- Press the MILK TYPE button based on the milk in the jug – DAIRY or PLANT-BASED.
- Turn the froth dial until THIN FROTH is illuminated.
- Press START FROTH to begin frothing.
- Optional: Drizzle caramel syrup on top and serve.
- Serve the Coffee
- Pour the frothed milk over the brewed espresso and serve.
How do I make a Café au lait with Ninja Luxe Café?
Brew Time: Approx. 4 minutes
Froth Time: Approx. 1 minute
Servings: 1 (11 oz.)
Difficulty: Beginner
Ingredients:
- 6 ounces (3/4 cup) freshly brewed coffee
- 5 ounces whole milk. Whole milk can be substituted with plant-based milk.
- Insert the Basket
- Insert the double basket into the portafilter by lining up the tabs on the basket with the notches on the portafilter and press down.
- Place the funnel on the portafilter, aligning the notches on the funnel with the notches on the portafilter. Push down until the funnel locks into place.
- Install the portafilter into the grinding cradle, making sure it's level and fits securely.
- Grind the Coffee
- Turn the center dial until CLASSIC is illuminated.
- Use the SIZE button to select 6 oz.
- Adjust the grind dial on the left side to match the current grind size to the recommended grind size.
- Press START GRIND.
- Prepare to Brew
- Remove the funnel and place portafilter in group head (angled to the left) by aligning orange dot on portafilter with orange dot on group head.
- Tamping is not required.
- Prepare the Cup
- Place a 12-ounce cup under portafilter.
- Press START BREW.
- Prepare the Milk
- Add the milk to the milk jug, then place the jug on the milk jug platform with the steam wand inside.
- Froth the Milk
- Press the MILK TYPE button until DAIRY is illuminated. Select PLANT-BASED if using a plant-based milk.
- Turn the froth dial until THICK FROTH is illuminated.
- Press START FROTH to begin frothing.
- Serve the Coffee
Pour the frothed milk over the brewed espresso and serve.
How do I make an Affogato with Ninja Luxe Café?
Brew Time: Approx. 2 minutes
Froth Time: Approx. 1 minute
Servings: 1 (6½ oz.)
Difficulty: Beginner
Ingredients:
- Double shot espresso
- 1-2 scoops vanilla ice cream
- Insert the Basket
- Insert the double basket into the portafilter by lining up the tabs on the basket with the notches on the portafilter and press down.
- Place the funnel on the portafilter, aligning the notches on the funnel with the notches on the portafilter. Push down until the funnel locks into place.
- Install the portafilter into the grinding cradle, making sure it's level and fits securely.
- Grind the Coffee
- Turn the center dial until ESPRESSO is illuminated.
- Adjust the grind dial on the left side to match the current grind size to the recommended grind size.
- Press START GRIND.
- Tamp the Grounds
- Tamp the grounds by pressing the tamper all the way down until it meets the funnel.
- Remove the funnel and place portafilter in group head (angled to the left) by aligning orange dot on portafilter with orange dot on group head.
- Prepare the Cup
- Place an espresso cup under portafilter.
- Press START BREW.
- Add Vanilla Ice Cream
- While the espresso brews, scoop 1-2 scoops of vanilla ice cream into a small glass.
- Pour the brewed espresso over the ice cream and serve immediately.
How do I brew a cold coffee with Ninja Luxe Café?
To brew a cold drink with Ninja Luxe Café, follow the steps below:
- Set up
- Insert Luxe basket in portafilter by aligning tabs on basket with notches on portafilter and press down.
- Place funnel on portafilter, aligning the notches on the funnel with the notches on the portafilter.
- Push down until funnel locks into place in the portafilter.
- Insert portafilter straight into grinding cradle, making sure it’s level and fits securely.
- Grind
- Turn the center dial to select COLD BREW.
- Press the SIZE button to select your brew size.
- Use grind dial on left side of machine to match current grind size to recommended grind size.
- Press START GRIND.
- Shake
- With the funnel still on, even out the grounds with a light shake.
- Remove funnel and store on left side of machine.
- Brew
- Install portafilter into group head by aligning orange dots and twisting to the right.
- Fill your cup with ice and place it under the portafilter.
- Press START BREW. When brewing is complete empty grounds into a knock box or container.
- Install portafilter into group head by aligning orange dots and twisting to the right.
- Froth
- Fill milk jug to one of the recommended fill lines.
- Place milk jug on milk jug platform.
- Press MILK TYPE button based on the milk that is in the jug.
- Turn froth dial to select your froth type, then press START FROTH.
- Fill milk jug to one of the recommended fill lines.
How do I brew a drip coffee with Ninja Luxe Café?
To brew a classic coffee drink with Ninja Luxe Café, follow the steps below:
- Set up
- Insert Luxe basket in portafilter by aligning tabs on basket with notches on portafilter and press down.
- Place funnel on portafilter, aligning the notches on the funnel with the notches on the portafilter.
- Push down until funnel locks into place in the portafilter.
- Insert portafilter straight into grinding cradle, making sure it’s level and fits securely.
- Grind
- Turn the center dial to select CLASSIC. Press the SIZE button to select your brew size.
- Use grind dial on left side of machine to match current grind size to recommended grind size.
- Press START GRIND
- Shake
- With the funnel still on, even out the grounds with a light shake
- Remove funnel and store on left side of machine.
- Brew
- Install portafilter into group head by aligning orange dots and twisting to the right.
- Place cup under portafilter.
- Press START BREW.
- When brewing is complete empty grounds into a knock box or container.
- Install portafilter into group head by aligning orange dots and twisting to the right.
- Froth
- Fill milk jug to one of the recommended fill lines. DO NOT exceed the max line.
- Place milk jug on milk jug platform.
- Press MILK TYPE button based on the milk that is in the jug.
- Turn froth dial to select your froth type, then press START FROTH.
- Fill milk jug to one of the recommended fill lines. DO NOT exceed the max line.
How do I make a Mocha with Ninja Luxe Café?
Brew Time: Approx. 2 minutes
Froth Time: Approx. 2 minutes
Difficulty: Beginner
Ingredients:
- Double shot espresso
- 2 tablespoons hot chocolate mix of choice
- 5 ounces whole milk. Whole milk can be substituted with plant-based milk.
- Insert the Basket
- Insert the double basket into the portafilter by lining up the tabs on the basket with the notches on the portafilter and press down.
- Place the funnel on the portafilter, aligning the notches on the funnel with the notches on the portafilter. Push down until the funnel locks into place.
- Install the portafilter into the grinding cradle, making sure it's level and fits securely.
- Grind the Coffee
- Turn the center dial until ESPRESSO is illuminated.
- Adjust the grind dial on the left side to match the current grind size to the recommended grind size.
- Press START GRIND.
- Tamp the Grounds
- Tamp the grounds by pressing the tamper all the way down until it meets the funnel.
- Remove the funnel and place portafilter in group head (angled to the left) by aligning orange dot on portafilter with orange dot on group head.
- Prepare the Cup
- Place a cup under the portafilter.
- Press START BREW.
- Prepare Hot Chocolate and Milk
- Add hot chocolate mix and milk to the milk jug, then place the jug on the platform with the steam wand inside.
- Froth the Milk
- Press the MILK TYPE button based on the milk in the jug – DAIRY or PLANT BASED.
- Turn the froth dial until THICK FROTH is illuminated.
- Press START FROTH to begin frothing.
- Serve the Coffee
- Pour the frothed hot chocolate milk over the brewed espresso and serve.
How do I make a Cortado with Ninja Luxe Café?
Brew Time: Approx. 2 minutes
Froth Time: Approx. 2 minutes
Difficulty: Beginner
Ingredients:
- Double shot espresso
- 2 ounces whole milk. Whole milk can be substituted with plant-based milk.
- Insert the Basket
- Insert the double basket into the portafilter by lining up the tabs on the basket with the notches on the portafilter and press down.
- Place the funnel on the portafilter, aligning the notches on the funnel with the notches on the portafilter. Push down until the funnel locks into place.
- Install the portafilter into the grinding cradle, making sure it's level and fits securely.
- Grind the Coffee
- Turn the center dial until ESPRESSO is illuminated.
- Adjust the grind dial on the left side to match the current grind size to the recommended grind size.
- Press START GRIND.
- Tamp the Grounds
- Tamp the grounds by pressing the tamper all the way down until it meets the funnel.
- Remove the funnel and place portafilter in group head (angled to the left) by aligning orange dot on portafilter with orange dot on group head.
- Prepare the Cup
- Place a cup under the portafilter.
- Press START BREW.
- Prepare the Milk
- Add the milk to the milk jug.
- Place the milk jug on the milk jug platform with the steam wand inside.
- Froth the Milk
- Press the MILK TYPE button based on the milk in the jug – DAIRY or PLANT BASED.
- Turn the froth dial until THIN FROTH is illuminated.
- Press START FROTH to begin frothing.
- Serve the Coffee
- Pour the frothed milk over the brewed espresso and serve.
What is the difference between Cold Brew and Over Ice?
- Cold brew is brewed at a lower temperature for an ultra-smooth, naturally sweet coffee.
- Over Ice is specially programmed to brew concentrated hot coffee over ice for a drink that is never watered down. Please ensure to fill your cup with ice before brewing either setting.
How to get a perfect crema on my espresso with Ninja Luxe Café?
Crema is the thick, foamy layer on top of an espresso drink. Its presence indicates that the extraction process is working correctly.
The variables that need to be in sync to produce great cream are: fresh coffee beans, the right grind, proper dosage, correct water temperature, and adequate coffee pressure.
- Maximizing Crema
Use a traditional narrow espresso cup (demi-tasse cup) to maximize crema. - Common Issues
Pale or thin crema can be caused by stale coffee, an overly coarse grind, cool water, low coffee dosage, low water dosage, or low pressure. - Benefits of Crema
Crema helps trap the sweet aromas of espresso, enhancing the flavor complexity when mixed. However, it will dissipate over time, becoming thinner and separating from the coffee. - Peak Quality
Espresso is at its best immediately after brewing, with thick, full, and foamy crema that ranges from tan to mahogany. Enjoy it right away for the best experience!
Tip: To get the perfect crema, make sure that the current grind size always matches the recommended grind before grinding and brewing.
Why is puck soggy after making a drink?
Either your grounds are too fine or you didn't tamp hard enough - make sure you are dialed in.
Why is my puck stuck to the grouphead?
This just happens sometimes due to the way we relive pressure, recommendation is to take portafilter out immediately after brewing.
What does "dialing in your espresso" mean?
"Dialing in" means calibrating the grind size for your beans to get the perfect espresso extraction for your drink.
Barista Assist Technology™ automatically does this for you. All you have to do, is simply brew 2 espressos, and the machine will calibrate for your current beans.
How can I customize the strength and temperature of my espresso drink?
You can customize the strength of your espresso-based drink through the Additional Settings menu using the Ratio Adjust feature, which allows you to modify the water-to-grounds ratio:
- 20: For a smaller, more concentrated espresso (2:1 ratio).
- 25: The default setting (2.5:1 ratio).
- 30: For a larger, less concentrated espresso (3:1 ratio).
You can also adjust the temperature to suit your preference.
Before brewing, use the SIZE button to select Low (1 dot), Medium (2 dots), or High (3 dots) settings. The temperature impacts the espresso extraction and overall flavor. For best results, use a low or medium temperature for darker roasts, and a medium or high temperature for lighter roasts.
Note: Temperature control is not available for over ice, cold brew, and cold-pressed.
Why does it seem like I get less coffee when brewing "cold brew" or "over ice"?
When brewing Cold Brew or Over Ice, please ensure that the cup you are brewing into is filled to the top with ice. These brews are specially designed to brew strong in order to account for ice melt. The size displayed on the control panel will reflect the volume of the drink after the ice melt.
Cleaning the Luxe Café
Which descaling solution should I use?
For best results, we recommend using the Descale Powder provided in the box and available on our website. Alternatively, you may use a solution of 16 ounces of vinegar mixed with 21 ounces of water.
The CLEAN light turned on, what do I do?
The clean cycle flushes out residual oils or grounds that are built up in and around the group head. When the CLEAN light illuminates you need to run a clean cycle.
Time to complete: approximately 6 minutes
The clean cycle requires the cleaning disc (included with the machine and stored in the accessory storage) and a cleaning tablet (also included and available for purchase on ninjakitchen.com/accessories).
Follow these steps to run a clean cycle:
- STEP 1
Ensure the main drip tray is empty the water brewed from the clean cycle will be deposited into the main drip tray. Tip: Not emptying the main drip tray may cause overflow.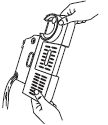
- STEP 2
Dissolve the provided Ninja descale powder in a separate container with 37 fl. oz. of water. Pour solution mixture into water reservoir.
- OR -
Fill the water reservoir with 16 oz. of white vinegar, then fill the reservoir to the Descale line with water.
- STEP 3
With the double basket inserted into the portafilter, place the cleaning disk on top of the basket, with the handle facing up.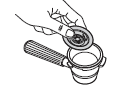
- STEP 4
Fasten the portafilter into the group head. - STEP 5
Place 1 cleaning tablet in the center of the cleaning disc.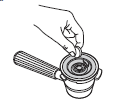
- STEP 6
Fasten the portafilter into the group head and press the CLEAN button. - STEP 7
The clean cycle will take approximately 6 minutes to complete. The machine will beep when the clean cycle is complete. - STEP 8
After the clean cycle is complete, remove both the portafilter and main drip tray with caution, as there may be water in both. Hand wash with warm soapy water.
The DESCALE light turned on, what do I do?
When the DESCALE light illuminates, you must run a descale cycle. If a descale isn’t performed after the light turns on, drink quality will diminish and the machine may clog and stop working.
Descaling breaks down and removes limescale and mineral buildup inside the machine.
Time to complete: approximately 90 minutes
Follow these steps to run a descale cycle:
- STEP 1
Ensure the main drip tray is completely emptied, as some of the water brewed from the descale cycle will be deposited into the main drip tray. Tip: Not emptying the main drip tray may cause overflow.
- STEP 2
Dissolve the provided Ninja descale powder in a separate container with 37 fl. oz. of water. Pour the solution mixture into the water reservoir OR Fill the water reservoir with 16 oz. of white vinegar, then fill the reservoir to the Descale line with water.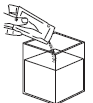
- STEP 3
Insert the double basket into the portafilter. - STEP 4
Fasten the portafilter into the group head. - STEP 5
Ensure the milk jug is placed on the milk jug platform with the steam wand inside. - STEP 6
Place an empty cup (at least 18 oz.) under the portafilter. You may have to remove the center drip tray. - STEP 7
Press the DESCALE button, then press the center dial to start the descale cycle. - STEP 8
The machine will start the descale cycle. The machine will flush the solution through the steam wand and portafilter for approximately 90 minutes. The machine will count down the remaining time on the control panel. - STEP 9
The machine will beep indicating when the descale cycle is complete. - STEP 10
After the cycle is complete, remove the portafilter, main drip tray, and milk jug with caution, as there will be water in each. - STEP 11
Empty the contents of each and hand-wash with warm, soapy water to remove any solution that could affect the flavor of your coffee. - STEP 13
Install the main drip tray back on the machine and install the portafilter in the group head. Do not install the milk jug. - STEP 14
Flush the group head by running a 12 oz. CLASSIC brew. - STEP 15
Then, with the milk jug uninstalled, flush the steam wand by pressing the PURGE button.
How much descale solution should I use in my espresso machine?
When running a descale cycle, 1 packet of the Descale Powder is required.
Does bottled water avoid limescale?
While using bottled water won't entirely eliminate the need for descaling your machine, it will decrease how frequently you'll have to do it.
When should I use the Purge function?
The steam wand comes equipped with its own cleaning program to get rid of inner debris and residue. After frothing, push the steam wand back into the down position without the milk jug and it will automatically flush itself out.
If the machine is not able to Auto-Purge, the Purge button will illuminate.
You must manually purge the frother by selecting the Purge button with the steam wand down and no milk jug on the platform before your next froth.
It is recommended to purge immediately after your froth to prevent build-up inside the steam wand.
Can I pour water into my bean hopper to clean out the grounds?
Do not pour water into the bean hopper while it is installed on the machine. Ensure that you remove the hopper from the machine for cleaning. The bean hopper and the bean hopper lid can be hand-washed and are dishwasher-safe.
Which parts are safe to clean in the dishwasher and which parts are not?
- Dishwasher safe parts: Funnel, whisk, cleaning disc, water reservoir, bean hopper, and all drip tray components.
- Not dishwasher safe parts: Assisted tamper, milk jug, all baskets, portafilter, cleaning brush, and adjustable drip tray.
Beans
What is the best way to store my coffee beans?
To keep your coffee beans fresh and flavorful, start by buying just enough whole beans to use up within a few weeks.
Once you've opened the package, transfer the beans to an airtight container like a sealed food storage container, ziplock bag, or any other sealed container. If you can't find an airtight container, simply squeeze the air out of the package and seal it tightly.
Store them in a cool, dry spot away from heat and light, as these can affect the quality of your coffee. Remember to clean your storage container after each use, as coffee has oils that can turn rancid over time, affecting its aroma and taste.
Coffee is sensitive to moisture, so be cautious not to expose it to water or humid environments, as it can absorb moisture and affect the flavor.
Can I use frozen beans in my grinder?
Using frozen beans in a grinder is not recommended. Frozen beans often contain air in the packaging, which can cause condensation when they thaw, making the beans wet. Grinding wet beans can introduce moisture into the grinder, potentially causing internal rust and damaging the machine. It also affects the taste of your coffee. Additionally, wet beans tend to clump together, leading to clogs in the grinder and improper feeding of the beans. This can result in the need for frequent maintenance of your machine.
What type of coffee beans should I use for espresso?
Begin your coffee exploration with these key considerations for selecting the perfect beans:
- Freshness
We recommend buying freshly roasted coffee beans and using them within 20 days of the “Roasted On” date. “Best By” dates can also be considered, as these packages are often vacuum-sealed to keep the coffee fresh. - Blend and Origins
When buying coffee, you have many options. Coffee flavor is influenced by where it's grown—this is called terroir, which includes factors like altitude, soil composition, weather, and harvest practices. Single-origin coffee may vary in flavor throughout the year, while blends combine beans from different regions to create a consistent taste year-round. - Roast Level
- Coffee can be roasted from very light to very dark.
- Lighter roasts often taste like milk chocolate, citrus fruits, raw nuts, and tart berries.
- Darker roasts develop flavors like dark chocolate, ripe berries, toasted nuts, caramel, brown sugar, and raisins.
Our Suggestion:
If you're new to making espresso at home, we suggest starting with a medium roast. It offers a smoother, milder flavor that's recommended for espresso newcomers. However, if you're already familiar with espresso, why not go for a dark roast? It'll give you that rich, bold flavor for your espresso drinks.
What type of coffee beans should I use for drip coffee?
Begin your coffee exploration with these key considerations for selecting the perfect beans:
- Freshness
We recommend buying freshly roasted coffee beans and using them within 20 days of the “Roasted On” date. “Best By” dates can also be considered, as these packages are often vacuum-sealed to keep the coffee fresh. - Blend and Origins
When buying coffee, you have many options. Coffee flavor is influenced by where it's grown—this is called terroir, which includes factors like altitude, soil composition, weather, and harvest practices. Single-origin coffee may vary in flavor throughout the year, while blends combine beans from different regions to create a consistent taste year-round. - Roast Level
- Coffee can be roasted from very light to very dark.
- Lighter roasts often taste like milk chocolate, citrus fruits, raw nuts, and tart berries.
- Darker roasts develop flavors like dark chocolate, ripe berries, toasted nuts, caramel, brown sugar, and raisins.
Our Suggestion:
Experiment with different coffee blends, origins, or roast levels until you find what you love. Enjoy the journey of discovering your perfect cup!
What type of coffee should I purchase for my first coffee drink with Ninja Luxe Café?
The Ninja Luxe Café is only compatible with whole-bean coffee.
Begin your coffee exploration with these key considerations for selecting the perfect beans:
- Freshness
We recommend buying freshly roasted coffee beans and using them within 20 days of the “Roasted On” date. “Best By” dates can also be considered, as these packages are often vacuum-sealed to keep the coffee fresh. - Blend and Origins
When buying coffee, you have many options. Coffee flavor is influenced by where it's grown—this is called terroir, which includes factors like altitude, soil composition, weather, and harvest practices. Single-origin coffee may vary in flavor throughout the year, while blends combine beans from different regions to create a consistent taste year-round. - Roast Level
- Coffee can be roasted from very light to very dark.
- Lighter roasts often taste like milk chocolate, citrus fruits, raw nuts, and tart berries.
- Darker roasts develop flavors like dark chocolate, ripe berries, toasted nuts, caramel, brown sugar, and raisins.
Our Suggestion:
Experiment with different coffee blends, origins, or roast levels until you find what you love. Enjoy the journey of discovering your perfect cup!
I don’t have whole beans, can I use ground beans for my coffee?
The Ninja Luxe Café is only compatible with whole bean coffee. For best results, use the grinder on the machine when grinding.
How to choose the right beans ?
Begin your coffee exploration with these key considerations for selecting the perfect beans:
- Freshness
We recommend buying freshly roasted coffee beans and using them within 20 days of the “Roasted On” date. “Best By” dates can also be considered, as these packages are often vacuum-sealed to keep the coffee fresh. - Blend and Origins
When buying coffee, you have many options. Coffee flavor is influenced by where it's grown—this is called terroir, which includes factors like altitude, soil composition, weather, and harvest practices. Single-origin coffee may vary in flavor throughout the year, while blends combine beans from different regions to create a consistent taste year-round. - Roast Level
- Coffee can be roasted from very light to very dark.
- Lighter roasts often taste like milk chocolate, citrus fruits, raw nuts, and tart berries.
- Darker roasts develop flavors like dark chocolate, ripe berries, toasted nuts, caramel, brown sugar, and raisins.
Our Suggestion:
Experiment with different coffee blends, origins, or roast levels until you find what you love. Enjoy the journey of discovering your perfect cup!
Should I store coffee beans in the freezer or refrigerator?
It's generally not recommended to store coffee beans in the freezer or refrigerator.
Freezing coffee beans might seem like a good idea, but it can actually harm their quality over time.
The moisture from the beans and even within the package can lead to ice crystals forming, which can degrade the flavor and aroma. Additionally, temperature fluctuations in the freezer can cause the beans to freeze and thaw repeatedly, further impacting their taste.
Storing coffee in a non-airtight container in the freezer or refrigerator isn't ideal, as the dry air inside these appliances can speed up the staling process. Plus, since coffee absorbs odors easily, it might pick up unwanted smells from other foods nearby.
Can I use flavored coffee beans with Ninja Luxe Café?
Flavored coffee should not be used in the Ninja Luxe Café espresso machine. The flavoring ingredients can coat the inside of the grinder, brew baskets, and portafilter, making them very difficult to clean and affecting the taste of future beverages. Instead, flavoring should be added to the beverage using syrup or sauce.
Can I use pre-ground beans for my coffee?
The Ninja Luxe Café is only compatible with whole bean coffee. For best results, use the grinder on the machine when grinding.
Control Panel Questions
What does the "Rinse" message on the control panel mean?
If you attempt to make a cold drink immediately after making a hot drink, you will get a RINSE notification above the center dial.
Here's what you do to clear RINSE notification:
*Ensure the portafilter is not installed in the group head before proceeding.
- STEP 1
Place a cup (that can hold at least 12 oz.) below the group head. - STEP 2
Press START BREW and allow the machine to rinse and get to the right temperature. - STEP 3
The machine will rinse approximately 8 oz. of water through the group head. - STEP 4
The machine will beep to indicate that the brew has started. The progress bar will illuminate indicating the status of the brew. When finished, the machine will beep again signifying the brew is complete. After the machine beeps a second time, remove the cup and dispose of the water.
Note: To avoid the RINSE process, brew all desired cold drinks before proceeding to hot drinks.
Can I select or adjust the temperature for my coffee drink on the Ninja Luxe Café?
The Ninja Luxe is equipped with three brew temperature settings. Before brewing use the BREW TEMP button on the control panel to adjust your brew temperature.
NOTE: Temperature settings available are Low (1 dot), Medium (2 dots), and High (3 dots). The temperature of the drink will affect the extraction of the espresso and the flavor of your drink. For best results and proper extraction, we recommend a low or medium temperature for darker roasts and a medium or high temperature for lighter roasts.
NOTE: Temperature control not available for over ice, cold brew, and cold-pressed.
Why I can't select my desired drink on the control panel?
The machine will only display coffee drinks compatible with the specific basket in the portafilter. If you don't see your desired drink, simply swap out the basket until you find the right match. The Ninja Luxe Café is compatible with the Double and Luxe basket. It is not compatible with the Single basket.
To brew a delicious coffee with the Ninja Luxe Café, begin by selecting the appropriate basket for your desired drink. Insert the basket into the portafilter, making sure the large tab on the basket aligns with the one on the portafilter, then press it firmly into place.
Next, securely place the funnel onto the portafilter to ensure a snug fit. Once the funnel is in position, install the portafilter straight into the grinding cradle, ensuring it's stable. Once installed, you're ready to select your drink and start brewing.
How do I turn off the beeps from the control panel?
To turn Silent Mode on, enter into the additional settings menu by holding the SIZE button for 3 seconds. Use the center dial to scroll to _h01. Press the center dial then scroll to 'On'. Turning Slient Mode on will turn the beeps off. Press the center dial again. To exit the additional settings menu, press and hold SIZE for 3 seconds.
Frothing
How do I froth?
Follow the steps below for frothing :
- STEP 1
To froth, start by filling the milk jug with your desired amount of milk. - STEP 2
Make sure not to exceed the Maximum Fill line. Next, place the milk jug on the platform with the steam wand inside the jug. - STEP 3
On the control panel, use the froth dial to select your desired froth setting.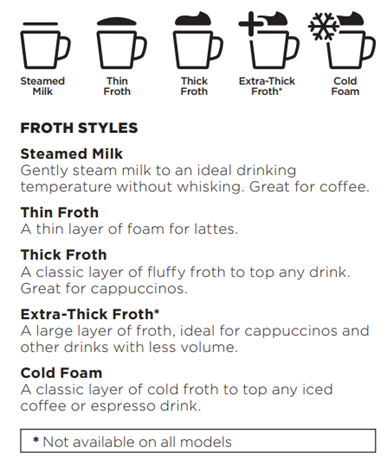
- STEP 4
Next, select dairy or plant-based milk type based on the milk that is in the jug. Press the froth dial to start frothing. Press START FROTH. The machine will beep to signal that the frothing has started. The progress bar will illuminate to indicate the status of the frothing. When finished, the machine will beep again.
After you finish frothing
Once you remove the milk jug, clean the steam wand with a damp cloth before pushing it back down.
When the steam wand is pushed back down, auto purging will occur. This is to clean the inside of the steam wand. The machine will beep to signal that the purge has started. When finished, the machine will beep again.
Froth queuing
After you have started your brew, you are able to queue up your froth to start immediately after the brew is finished.
- Fill your milk jug with the desired amount of milk, but do not exceed the max fill line.
- While brewing, select dairy or plant-based milk with the "milk type" button and froth setting with the froth dial.
- Press "Start Froth". Cold foam does not need to be queued and can froth while the machine is brewing.
NOTE: DO NOT froth milk directly into the espresso or coffee; always froth in the milk jug and pour the froth into the espresso or coffee base afterward.
Can I change the temperature of my froth?
Yes, you can change the temperature for the froth. To do this, press and hold the SIZE button for 3 seconds to access the Additional Settings menu. Using the center dial, scroll to _h07 and press the center dial. Here, you can choose between low, medium, and high settings. To select your setting, press the center dial again. To exit the menu, press again the SIZE button.
How do I manually froth with Ninja Luxe Café?
To froth manually using Ninja Luxe Cafe, follow these steps:
- STEP 1
Fill the milk jug as desired in between the min and max fill lines. - STEP 2
Make sure you are on the steamed milk setting. - STEP 3
Pull the steam wand out. Place the steam wand inside the milk jug so that the wand is resting within the milk jug spout. - STEP 4
Angle the milk jug slightly to the left or right so that the steam wand is about a finger’s width away from the wall of the milk jug.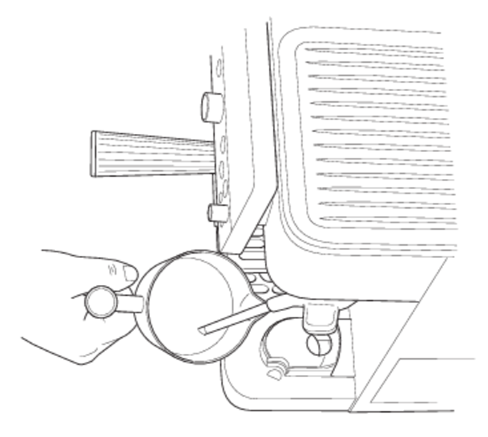
- STEP 5
Hold START FROTH for 3 seconds. The machine will beep to indicate that frothing has started, and steam will start to generate from the wand. - STEP 6
Place the wand just below the surface of the milk to start incorporating air to stretch the volume of milk. This should start to create a whirlpool with the milk.
- STEP 7
Once you feel comfortable with the volume of milk, move the jug up so the steam wand is further below the surface. This is to heat your drink up. - STEP 8
Stay in that position until the jug is too hot to hold with your hand, then press START FROTH to turn the function off.
How can I improve my quality of froth?
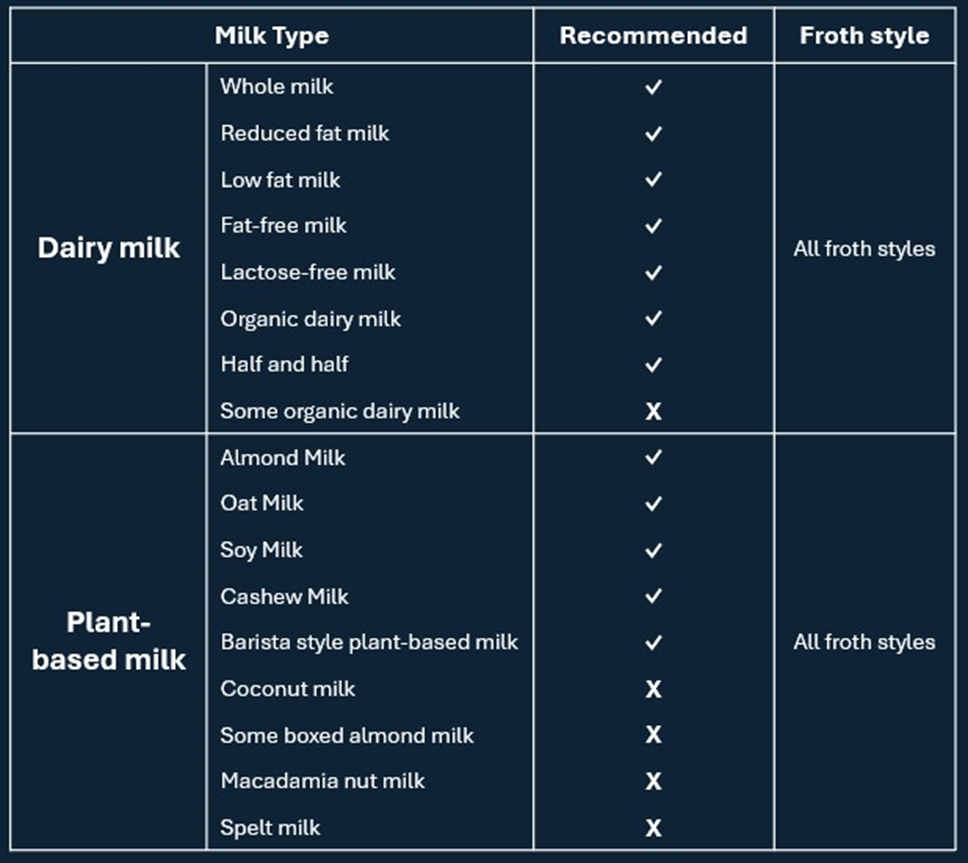
To improve the quality of your froth, use a milk with a higher fat content. For non-dairy milks, we recommend barista blends for optimal outputs.
Grinding
How do I grind with Ninja Luxe Café?
Follow the step-by-step guide below for grinding with Ninja Luxe Café:
- STEP 1
Start by selecting the drink you wish to make on the control panel. - STEP 2
Select the basket based on drink choice. - STEP 3
With the basket inserted into the portafilter and the funnel on top, place the portafilter into the grinding cradle. Insert portafilter straight into grinding cradle, making sure it’s level and fits securely. - STEP 4
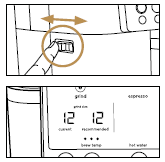
For the optimal brew, use the grind dial on the left side of the machine to match the "Recommended" with the "Current" grind setting. - STEP 5
Select the "Start Grind" button to begin grinding. - STEP 6
When this is complete, remove the portafilter from the grinding cradle. - STEP 7
With the funnel still on, tamp the grounds down using the tamper. Push down until the handle touches the funnel. Remove the funnel and you are now ready to brew.
Why should I follow the recommended grind setting on the machine?
The Ninja Luxe Café is continuously monitoring your brews to provide the grind setting recommendation that will create the perfect cup of espresso. The machine considers brew time and pressure so that you don't have to.
Barista Assist Technology is Ninja’s solution to the tiresome process of dialing in beans. We do the process for you and require zero user input. Barista Assist Technology recommends the optimal grind size based on your selected drink type. Recommendations are different and will change on the control panel based on whether espresso vs. quad vs. coffee drinks are selected.
How it works? After a brew is complete, Barista Assist Technology will automatically adjust the recommended grind size to where it is calculated is best for your beans. This means every completed espresso brew will factor into Barista Assist Technology and either keep or change the recommended grind size depending on what is best for your beans at that time.
Below is a guide that shows where recommended grind settings will likely fall for each drink depending on the bean type and age of the bean.
*All grinders utilize different numbers, the Ninja Luxe Café grinder numbers will not align with a competitor brand.
How do I calibrate/adjust the coffee grinder ?
Barista Assist Technology™ learns from past brews and automatically recommends the grind size based on the beans and past brew outputs.
- Simply brew 2 espressos, and the machine will calibrate for your current beans.
Step-by-step guide to calibrating:
- STEP 1
To calibrate your grinder, brew 2 espressos. - STEP 2
While you can still drink your first two brews, please note that the flavor and crema may not be optimal. - STEP 3
Ensure to match your current grind setting to the recommended one each time you brew. - STEP 4
After the second brew, your grinder is calibrated, and you can enjoy your perfect drink.
Tips:
- Remember to repeat this process when you change the beans in the bean hopper.
- Keep in mind that the recommended grind size may change as beans age or when using new beans. Barista Assist Technology™ will make adjustments to ensure proper espresso extraction.
- Coffee grinder calibration is only necessary for single, double, and quad shots.
Why is the recommended grind size occasionally changing on Ninja Luxe Café?
The recommended grind size adjusts for for the current coffee drink selection. Once a brew is selected, Barista Assist Technology™ recommends a grind size based on the beans and previous brew output. If you wish to follow the recommended size, use the grind dial on the side of the machine to adjust the current grind size to match the recommended grind size. This monitors every brew, so you may notice this change over time.
General Usage and Product Specs
Can I make coffee and froth at the same time?
No, you cannot brew and froth at the same time.
To queue your froth, start a froth cycle at any point during the brew. This will allow the frother to start once the brew is complete.
Froth queuing:
After you have started your brew, you can queue up your froth to start immediately after the brew is finished.
- STEP 1
Fill your milk jug with the desired amount of milk, but do not exceed the max fill line. - STEP 2
While brewing, select dairy or plant-based milk with the "milk type" button and the froth setting with the froth dial. - STEP 3
Press "Start Froth".
Note: Cold foam does not need to be queued and can froth while the machine is brewing.
Can I make coffee and grind at the same time?
No, you cannot grind and brew at the same time.
Can I grind and froth at the same time?
No, you cannot grind and froth at the same time.
How do I know when my drip tray is full?
As you brew, the drip tray will fill up. When the orange empty indicator rises enough to be visible, it's time to empty the main drip tray.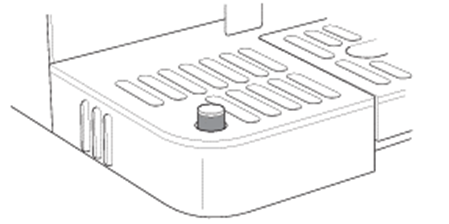
- Remove the main drip tray from the machine by pulling the tray away.
- Carefully move the main drip tray to the sink and pour water out through the pour spout.
- Insert the drip tray back into the machine.
After brewing coffee, there's a significant amount of water in the drip tray. Should I be concerned?
During and after a brew, a small amount of water will be dispensed into the drip tray. This is normal. To prevent the drip tray from overfilling, please empty the drip tray frequently or when the orange drip tray indicator is visible.
How do I adjust the grinder setting on my espresso machine?
To match the current grind size to the recommended grind size, turn the grind dial on the left side of your machine.
 |
 |
How do I prime my machine?
This is the step-by-step guide to prime the machine.
- STEP 1
Fill the water reservoir to the Max Fill line. - STEP 2
With the double basket inserted into the portafilter, insert the portafilter into the group head. - STEP 3
Place a 12oz cup under the group head and ensure the milk jug is on the platform with the steam wand in the jug. - STEP 4
Select a 12oz coffee drink and run a water-only brew into the cup. - STEP 5
When this is complete, press the "Purge" button to flush water through the steam wand. When this cycle is complete, discard the water in both the cup and the milk jug. Priming is complete.
What water shall I use for Cold Brew?
Always brew with cold or room-temperature water. Brewing with hot water may have unintended consequences on your machine.
Why can't I change my brew setting after grinding?
With the Ninja Luxe Café, you select your desired drink before grinding. The machine will grind the necessary amount of grounds to the required coarseness for the chosen drink.
After the grinding process is complete, the machine will be set to the selected brew style and size associated with that grind.
To change the brew style and size after grinding, empty the grounds from the portafilter, power off and on the machine, and then select your preferred brew again.
How do I switch out the beans in the hopper?
Please follow the steps below to switch out the beans in your hopper:
- STEP 1
To change beans, unlock the bean hopper by rotating the handle counterclockwise.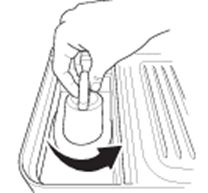
- STEP 2
Remove the bean hopper and pour out any leftover beans into a container. - STEP 3
Place the hopper back on the machine and lock it into place by rotating the handle clockwise.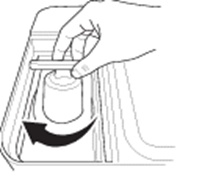
- STEP 4
With the funnel attached, place the portafilter into the grinding cradle and select START GRIND to clear and leftover beans. - STEP 5
You can now fill the hopper with the new beans. You will have to dial in your machine every time you change beans.
How to use the Additional settings menu?
The Additional Settings menu offers additional options to customize your machine and is accessible by pressing and holding the SIZE button for 3 seconds.
Navigate through these topics by turning the center dial.
- STEP 1
Press START BREW to select your desired topic. - STEP 2
Once you select into a topic, turn the center dial to get to your desired option and press START BREW to make your selection. - STEP 3
After a selection is made, you will hear a beep and return to the menu screen. - STEP 4
You can exit the menu by pressing the SIZE button again.
How to install the portafilter?
To install the portafilter for grinding, proceed with the following steps:
- STEP 1
Place the portafilter in the group head by aligning the orange dot on the portafilter with the orange dot on the group head. - STEP 2
With the funnel on top of the portafilter, insert it into the grinding cradle. Make sure it is level and fits securely. Once the portafilter is installed in the grinding cradle, it will be weighed. To ensure accurate weight, let go of the portafilter. - STEP 3
The machine will detect which basket is locked into it. The machine will display an animation, then the control panel will illuminate the selectable brew options based on the basket that is installed.
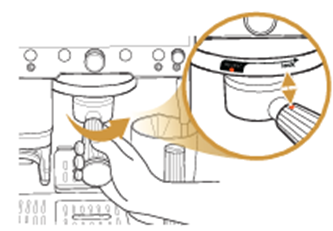
To install the portafilter for brewing, proceed with the following steps:
- STEP 1
Place the portafilter in the group head by aligning the orange dot on the portafilter with the orange dot on the group head.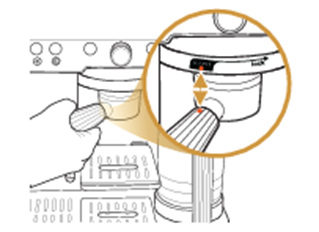
- STEP 2
Twist the portafilter into the group head until the orange dot on the portafilter aligns with the lock arrow on the group head.
 |
 |
Will the machine remember programmed settings if unplugged ?
When unplugged, the Ninja Luxe Café will remember settings such as water hardness, temperature, drink ratio, and current grind setting.
How many watts are required for this machine?
The Ninja Luxe Café is rated for 1650W.
What are the dimensions of the Ninja Luxe Café? How much space does the machine require on my countertop?
The Ninja Luxe Café has dimensions of 12.5 inches in width, 12.5 inches in length, and 14.75 inches in height.
Is the grinder detachable ?
No, the grinder is not detachable.
How long is the power cord ?
The power cord is 40 inches long.
Is this machine BPA free?
Yes, the Ninja Luxe Café is BPA free.
What material are the grinder blades made of ?
The grinder burrs are made out of stainless steel.
Water Hardness
How should I proceed with the water test strip?
The water test strip is provided to complete a water hardness test. When you plug your machine in for the first time, you will be prompted with "_hd5" notification on the right side of the display screen.
All water has minerals that can cause buildup in your machine over time. These minerals are referred to as water hardness and will impact how often you will need to descale your machine. Doing this test will ensure your machine recommends a descale at the right time. The machine can be set to whatever water hardness you have available.
To set your water hardness level please follow the steps below:
- STEP 1
Remove the test strip from the pack. - STEP 2
Completely submerge the strip in water for 5-10 seconds. Pull the test strip out and lightly shake it. - STEP 3
Place the test strip on a dry, flat surface and wait 1 minute for the results. After 1 minute, you will see 0-5 purple squares appear. This will indicate the water hardness level of your water (0 purple squares = level 0, 5 purple squares = level 5, etc) - STEP 4
After identifying your water level hardness, plug the machine in and turn it on by pressing the power button. Look at the left side of the control panel, it should display "hd 5"**. Rotate the center dial to program your water level hardness by matching the number of purple squares on your strip to the number displayed. Press the center dial to confirm.
** If "hd 5" does not populate on your screen, this can be found in the Additional Settings menu. - STEP 5
Press and hold the SIZE button for 3 seconds. Use the center dial to scroll to "_h08" and press the center dial. - STEP 6
Use the center dial to scroll and select your water hardness level. Hold the SIZE button for 3 seconds to exit the menu.
How do I set the water hardness on my espresso machine?
The water test strip is provided to complete a water hardness test. When you plug your machine in for the first time, you will be prompted with "_hd5" notification on the right side of the display screen.
All water has minerals that can cause buildup in your machine over time. These minerals are referred to as water hardness and will impact how often you will need to descale your machine. Doing this test will ensure your machine recommends a descale at the right time. The machine can be set to whatever water hardness you have available.
To set your water hardness level please follow the steps below:
- STEP 1
Remove the test strip from the pack. - STEP 2
Completely submerge the strip in water for 5-10 seconds. Pull the test strip out and lightly shake it. - STEP 3
Place the test strip on a dry, flat surface and wait 1 minute for the results. After 1 minute, you will see 0-5 purple squares appear. This will indicate the water hardness level of your water (0 purple squares = level 0, 5 purple squares = level 5, etc) - STEP 4
After identifying your water level hardness, plug the machine in and turn it on by pressing the power button. Look at the left side of the control panel, it should display "hd 5"**. Rotate the center dial to program your water level hardness by matching the number of purple squares on your strip to the number displayed. Press the center dial to confirm.
** If "hd 5" does not populate on your screen, this can be found in the Additional Settings menu. - STEP 5
Press and hold the SIZE button for 3 seconds. Use the center dial to scroll to "_h08" and press the center dial. - STEP 6
Use the center dial to scroll and select your water hardness level. Hold the SIZE button for 3 seconds to exit the menu.
Tamping
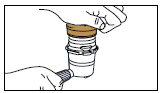
How do I tamp a quad shot?
When brewing a quad shot, tamp the grounds normally with the funnel on the portafilter. After that, remove the funnel and tamp down the grounds one more time.
Follow these steps for tamping:
- STEP 1
When grinding is complete remove the portafilter from the grinding cradle. Keep the funnel attached to the portafilter. - STEP 2
Place the portafilter on a solid, level surface, then place the assisted tamper inside the funnel. Press the tamper all the way down until it meets the funnel. - STEP 3
After that, remove the funnel and tamp down the grounds one more time. - STEP 4
Now that tamping is complete, remove both the tamper and funnel from the portafilter and store them in their respective locations on the left side of the machine.
How/when to use the tamper?
Be sure to tamp on all espresso drinks, as well as 16 oz. and 18 oz. coffee drinks; this is to ensure no grounds spill over the edge of the portafilter.
For 6 oz. to 14 oz. coffee drinks, lightly shake the portafilter to level the coffee grounds, and then proceed to brew.
When brewing a quad shot, tamp the grounds normally with the funnel on the portafilter. After that, remove the funnel and tamp down the grounds one more time.
Follow these steps for tamping:
- STEP 1
When grinding is complete remove the portafilter from the grinding cradle. Keep the funnel attached to the portafilter. - STEP 2
Place the portafilter on a solid, level surface, then place the assisted tamper inside the funnel. Press the tamper all the way down until it meets the funnel.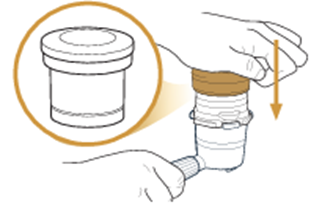
- STEP 3
Now that tamping is complete, remove both the tamper and funnel from the portafilter and store them in their respective locations on the left side of the machine.