This article contains the DT550 Series Ninja® Prestige Smart XL Air Fryer & Countertop Oven FAQs. This supports the DT551.
Product Specs
What are the internal dimensions and capacity of the oven?
2.6 cubic feet; 12.1"D x 13.9"W x 10.1"H (308 cm D x 354 cm W x 257 cm H)
What are the external dimensions of the oven?
17.09”D x 20.22”W x 13.34” H (43.4 cm D x 51.3 cm W x 33.8 cm H)
Is the sheet pan nonstick?
No, the sheet pan is enamel. We recommend lining the sheet pan with aluminum foil/parchment paper or lightly coating with recommended oils for easy clean up after cooking. Soak the sheet pan in warm, soapy water overnight for stuck-on grease.
What is the wattage?
This unit is 1800 watts.
What are the accessory dimensions?
Wire Rack
11.4” D x 14.4” W x 0.35” H
(290 cm D x 366 cm W x 9 cm H)
Bake Tray
13.46” D x 14.8” W x 1.00” H
(34.1 cm D x 37.5 cm W x 2.5 cm H)
Air Fry Basket
14.41” D x 11.26” W x 1.04” H
(34.6 cm D x 28.6 cm W x 2.6 cm H)
Roast Tray
13.46” D x 14.8” W x .83” H
(34.1 cm D x 37.5 cm W x 2.1 cm H)
Cleaning
Which accessories are dishwasher safe?
All accessories are hand-wash recommended:
- Air Fry Basket
- Wire Rack
- Crumb Tray
- Sheet Pan
How do I clean the oven?
Everyday Cleaning:
- Unplug the unit from the wall outlet and allow it to cool down before cleaning.
- Empty crumb tray by sliding it out of the oven.
- After every use, wipe away any food splatter on the interior walls and glass door of the unit with a soft, damp sponge.
- To clean the exterior of the main unit and the control panel, wipe them clean with a damp cloth. A non-abrasive liquid cleanser or mild spray solution may be used. Apply the cleanser to the sponge, not the oven surface, before cleaning.
- When using accessories, we recommend greasing them with recommended cooking oil, or covering them with parchment paper or aluminum foil before placing food on top. DO NOT cover roast tray holes with parchment paper or aluminum foil.
Deep Cleaning:
- Unplug the unit from the outlet and allow it to cool down before cleaning.
- Remove all accessories from the unit, including the crumb tray, and wash separately. Use a non-abrasive cleaning brush to more thoroughly wash the air fry basket. Accessories are hand-wash recommended. DO NOT place roast tray, sheet pan, or crumb tray in dishwasher.
- Use warm, soapy water and a soft cloth to wash the oven’s interior and glass door. DO NOT use abrasive cleaners, scrubbing brushes, or chemical cleaners, as they will damage the oven. CAUTION: NEVER put the main unit in the dishwasher or immerse it in water or any other liquid.
- To remove tough grease, let sheet pan and roast tray soak overnight in warm, soapy water, then wash with a non-abrasive sponge or brush.
- Thoroughly dry all parts before placing them back in the oven.
How can I clean the sheet pan?
For stuck-on food, let the sheet pan soak before cleaning. Line the sheet pan with aluminum foil or parchment paper when cooking to make clean-up easier.
How to Use and Cooking Questions
Does the oven pause when I open the door during cooking?
No. To pause the unit, simply press the START/STOP button.
Do I need to add oil when air frying?
Although oil is not required, we recommend that you start with one tablespoon and adjust it for personal preference or otherwise that you use the amount of oil suggested in your recipe.
Can I adjust the cook time and/or temperature once the unit is running?
Yes, you can adjust the cook time and/or temperature at any point during cooking by pressing the TIME/SLICES +/- buttons and TEMP/SHADE +/- buttons. Times and temperatures are always affected by the type of food, amount of food, whether accessories are placed correctly, and whether preheating instructions have been followed. Always keep an eye on your food while cooking.
Which accessories I should use for each function?
Use the recommended accessories as presented in the image below: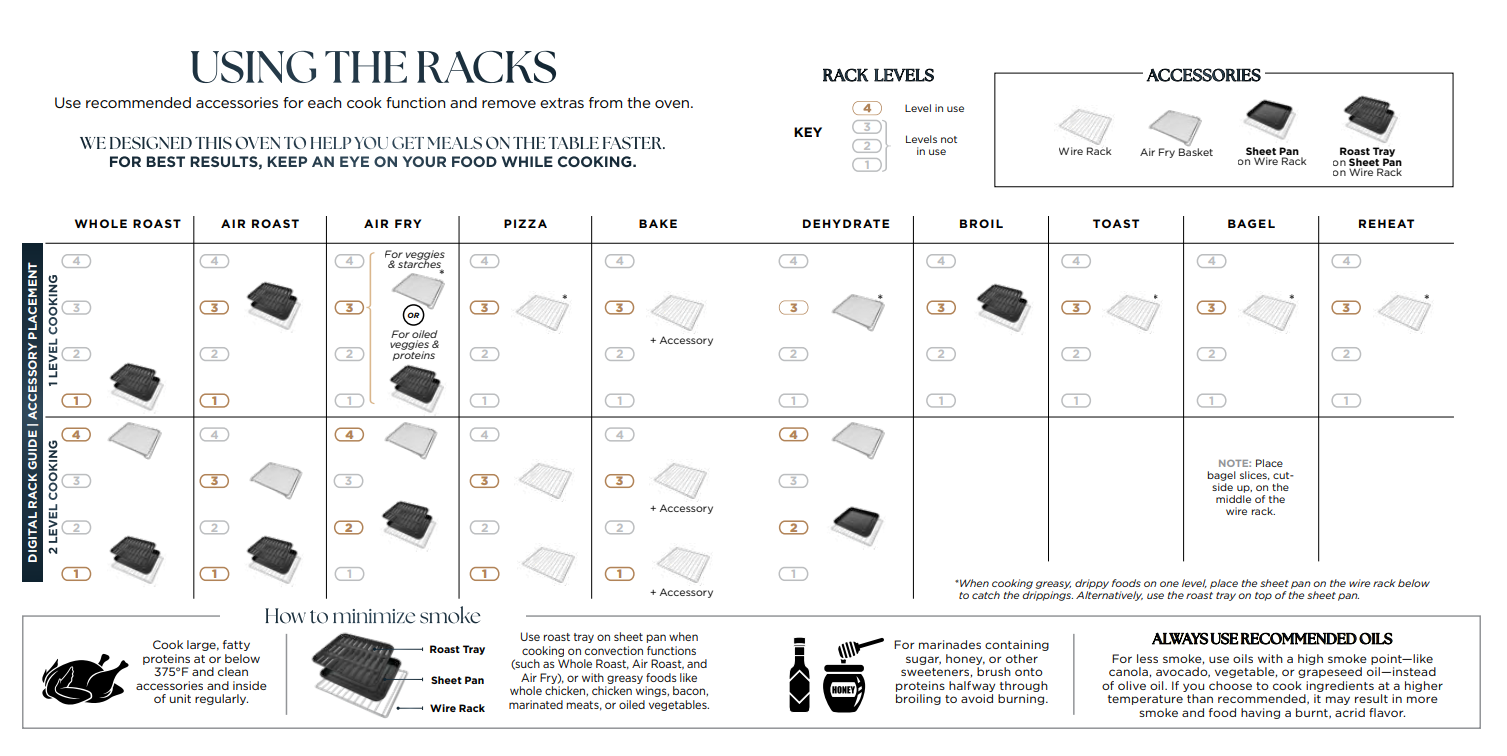
Do I need to add preheating time when setting a cook time?
The unit will automatically preheat when Pizza, Air Fry, Whole Roast, Air Roast, Reheat, and Bake. Preheat is not necessary or available when using Broil, Toast, Bagel, and Dehydrate.
Why is my food overcooked or undercooked even though I used the thermometer?
It is important to insert the thermometer lengthwise into the thickest part of the protein to get the most accurate reading. Make sure to allow food to rest for 3–5 minutes to complete cooking. For more information on recommended doneness while using the MANUAL function and doneness temperatures while using the PRESET function, refer to the Using the Auto Detect Intelligence Thermometer Section in the Owner's Guide.
How do I set the timer?
Press the TIME/SLICES +/- buttons to set the time. You can change the time at any point during cooking by using the TIME/SLICES +/- buttons.
How do I set the temperature?
Press the TEMP/SHADE +/- buttons to set the temperature. You can change the temperature at any point during cooking by pressing the TEMP/SHADE +/- buttons.
Can I use parchment paper?
Yes. Parchment paper can be used in the unit the same way that you would use it in your conventional oven. Make sure the parchment paper is not touching the interior side walls or top heating elements.
Can I use aluminum foil?
Yes. Use aluminum foil on the Sheet Pan or wire rack for easy cleaning after cooking. Make sure the aluminum is not touching the top heating elements. Do not wrap the crumb tray in aluminum foil.
Can I use the sheet pan instead of the air fry basket with Air Fry function?
Yes, but crispiness results may vary.
Do I need to adjust the cook times and temperatures of traditional oven recipes?
For best results, check on your food while cooking. Refer to cook charts in the Inspiration Guide for more guidance on cook times and temperatures.
Please note that Whole Roast, Air Roast, and Air Fry function times will be shorter, but the Bake function time should be the same as a traditional oven.
Can I restore the oven to its default settings?
The oven will remember the last setting used for each function, even if you unplug it. To restore the oven’s default settings for each function, press the Light and 2 LEVEL buttons simultaneously for 5 seconds.
Thermometer, Timer and other Questions
Why is my food overcooked or undercooked even though I used the thermometer?
It is important to insert the thermometer lengthwise into the thickest part of the protein to get the most accurate reading. Make sure to allow food to rest for 3–5 minutes to complete cooking. For more information on recommended doneness while using the MANUAL function and doneness temperatures while using the PRESET function, refer to the Using the Auto Detect Intelligence Thermometer Section in the Owner's Guide.
Will the thermometer grip melt if it touches the heating elements inside the oven?
Ensure the grip does not touch any of the heating elements inside of the oven. It will feel hot to touch after a cook cycle, so be sure to let cool or remove with an oven mitt.
How should I use the Prestige Smart Thermometer?
Make sure the thermometer jack is free of any residue and the cord is free of knots before plugging it into the jack.
- Remove the thermometer from storage. Then unwind the cord from the cord wrap to remove the thermometer on the right side of the unit.
- Plug the thermometer into the jack located on the underside of door handle below the SMART COOK SYSTEM buttons. Push firmly on the plug until it cannot go into the jack any further and you hear the plug click into place.
- The thermometer icon on the display will illuminate once the thermometer is plugged in and the thermometer mode is enabled by pressing the PRESET or MANUAL button. Select the desired cook function (e.g., Whole Roast) and change cook temperature accordingly.
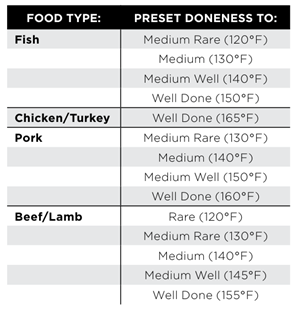
- Press the FUNCTION +/- buttons to toggle through and select your desired food type and press DONENESS repeatedly to set the internal doneness of your food (Rare through Well). If selecting the MANUAL button, use the below recommended internal cook temperatures.
- Place the accessory required for your selected cook function in the unit and close the hood. Press START/STOP to begin preheating.
- While the unit is preheating, insert the thermometer horizontally into the center of the thickest part of the piece of protein. Refer to the chart on the next page for further thermometer placement instructions.
- When the unit has preheated and the unit beeps, open the door, place food with inserted thermometer in the unit, and close the door over the thermometer cord.
- The display will show the current thermometer temperature and target thermometer temperature to show progress. Press TEMP/SHADE +/- buttons to view the oven temperature and TIME/SLICES +/- buttons to view time since start of cook.
- The unit will automatically stop when thermometer temperature has reached the target. Display will beep and show “COOK END”
- Transfer protein to a plate and allow to rest for 5 minutes before serving
What do the different functions do?
- WHOLE ROAST: Simultaneously roast larger proteins, like a 5-lb chicken, and sides for a complete meal. Or cook a larger protein, like a 12-lb turkey, on its own.
- AIR ROAST: Achieve a crispy outside and perfectly cooked inside for full-sized sheet pan meals, thicker proteins, and roasted veggies.
- AIR FRY: Foods that would traditionally be fried—such as chicken wings, French fries, and chicken nuggets—with little to no added oil.
- BAKE: Evenly bake everything from your favorite cookies to cakes.
- DEHYDRATE: Dehydrate meats, fruits, and vegetables for healthy snacks.
- BROIL: Evenly broil meats, fish and brown the tops of casseroles.
- TOAST: Toast up to 9 slices of bread to your desired level of darkness.
- BAGEL: Perfectly toast up to 9 bagel halves when they’re placed cut-side up on the wire rack.
- PIZZA: Cook frozen or homemade pizzas evenly.
- REHEAT: Heat leftovers without over cooking.
What is the temperature range for each function?
The temperature range varies depending on the function:
- AIR FRY: 250°F–450°F (121°C-232°C)
- AIR ROAST: 250°F–450°F (121°C-232°C)
- BROIL: 400°F (204°C )(Lo) or 450°F (232°C ) (Hi)
- BAKE: 180°F–450°F (82°C-232°C)
- TOAST: 450°F (232°C)
- BAGEL: 450°F (232°C)
- DEHYDRATE: 85°F–200°F (29°C-93°C)
- REHEAT: 100°F–450°F (36°C-232°C)
- PIZZA: 180°F–450°F (82°C-232°C)
- WHOLE ROAST: 250°F–450°F (121°C-232°C)
What are the timer increments?
The timer increments vary depending on the function:
- WHOLE ROAST: 1-minute increments up to 4 hours
- AIR FRY: 1-minute increments up to 4 hours
- AIR ROAST: 1-minute increments up to 4 hours
- BROIL: 10-second increments up to 30 minutes
- BAKE: 1-minute increments up to 4 hours
- TOAST: Total time ranging from 30 seconds to 10 minutes in increments adjusted by the shade level/slice settings
- BAGEL: Total time ranging from 30 seconds to 10 minutes in increments adjusted by the shade level/slice settings
- DEHYDRATE: 15-minute increments up to 24 hours
- PIZZA: 1-minute increments up to 4 hours
- REHEAT: 1-minute increments up to 4 hours
Why do the heating elements appear to be turning on and off?
This is normal. The oven is designed to control temperature precisely for every function by adjusting the heating element's power levels.
Why is steam coming out from the oven door?
This is normal. Foods with a high moisture content may release steam around the door.
Why is water dripping onto the counter from under the door?
This is normal. The condensation created by foods with a high moisture content (such as frozen breads) may run down the inside of the door and drip onto the counter.
Why is the unit generating smoke?
Ensure you are using the roast tray with the sheet pan when cooking all greasy foods or when cooking in Air Fry, Air Roast, or Whole Roast modes.
If problem persists, run a Toast cycle on shade 7 with accessories removed; this will burn off any additional grease on the heating elements that are causing smoke.
Ensure that you are using the recommended oils:
- Recommended: Canola, Refined Coconut, Avocado, Grapeseed, Vegetable
- Not Recommended: Olive Oil, Butter, Margarine
If you are using a marinade ensure that you are applying it halfway through the cooking cycle, because it will result in smoking/burning of the marinade. Cook any fatty foods at 375° F or lower temp. Be sure no food is directly contacting the top heating elements or the top of the cooking cavity.
Make sure to clean in between uses to mitigate grease buildup that can cause smoke. Cleaning the crumb tray in between uses can mitigate smoke.
Why did a circuit breaker trip while using the unit?
The unit uses 1800 watts of power, so it must be plugged into an outlet on a 15-amp circuit breaker. It is also important that the unit be the only appliance plugged into an outlet when in use. To avoid tripping a breaker, make sure the unit is the only appliance plugged into an outlet on a 15-amp breaker.
Why is my unit making loud noise?
The unit is working properly. The unit emits noise because of the fan working to ensure efficient cook time. If there is a rattle sound or periodic ticking sound, please contact Customer Service at 1-877-646-5288. [[AGENT-ONLY]](Advocate: proceed to TS) [[/AGENT-ONLY]]
Why does the unit sound like it's still running even though the power is off?
The cooling fan may continue to run even after the unit has been turned off. This is a normal function and should not be a source of concern. The cooling fan will stop after the temperature of the unit reaches below 95°F (35°C).