This article contains the FAQs for the SP200 Series Ninja® Foodi™ Digital Air Fry Oven Pro. This supports the following product SKUs SP200, SP201, SP251Q, SP251QCM, SP251QBK, SP251QNV, SP251QPR, SP251QAQ, SP251QRD, FT405CO, FT201A and FT205CCO.
How to Operate
What do the different functions do?
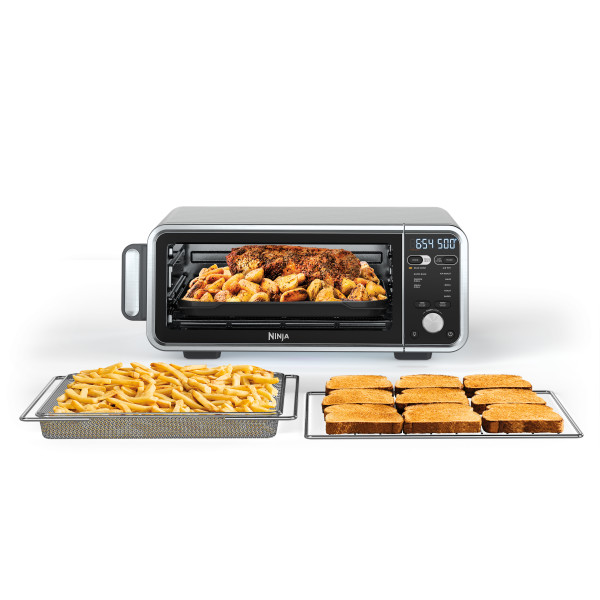
• AIR FRY: Make foods that would traditionally be fried—such as chicken wings, French fries, and chicken nuggets—with little to no added oil.
• AIR ROAST: Achieve a crispy outside and perfectly cooked inside for full- sized sheet pan meals, thicker proteins, and roasted veggies.
• BROIL: Broil meat and fish and evenly brown the tops of casseroles.
• BAKE: Bake everything from your favorite cookies to homemade pizzas.
• BAGEL: Designed to perfectly toast up to 6 bagel halves when they’re placed cut-side up on the wire rack.
• TOAST: Evenly toast up to 9 slices of bread to the perfect level of darkness.
• DEHYDRATE: Dehydrate meats, fruits, and vegetables for healthy snacks (not included on all models).
• REHEAT: Heat leftovers without overcooking (not included on all models).
• SEAR CRISP: Sear larger cut proteins, vegetables.
• RAPID BAKE: Jumpstart doughs for an extra rise and make quick breads.
• GRIDDLE: Griddle breakfast foods, quesadillas, sandwiches, etc.
• FRESH PIZZA: Make fresh homemade pizza from thin to thick crusts.
• FROZEN PIZZA: Quickly cook frozen pizza from thin to thick crusts.
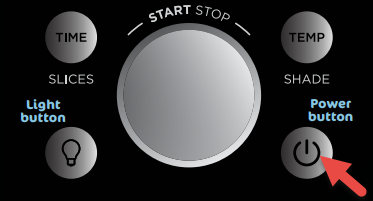
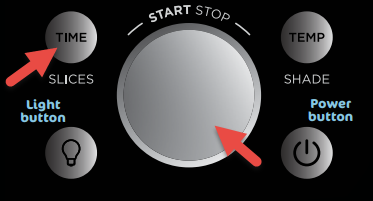
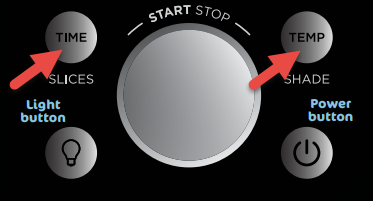
Where is the power button located?
The power button is located on the bottom right side of the control panel.
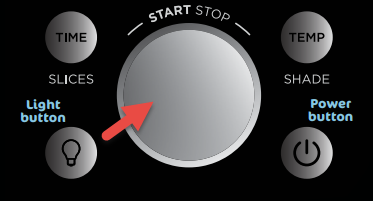
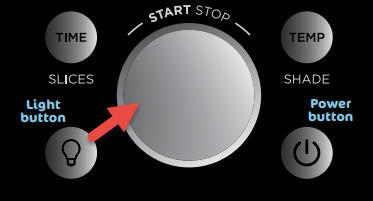
Does the unit pause when I open the door during cooking?
No. To pause the unit, simply press the dial, which serves as the START/STOP button.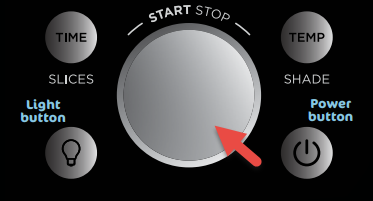
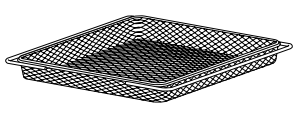
When should I use the air fry basket?
Use the air fry basket in the top rails with the Air Fry and Dehydrate functions to maximize airflow. When cooking foods that may drip, slide the SearPlate into the bottom rails to catch any drippings from hitting the bottom heating elements.
When do I use the sheet pan?
Use the sheet pan for any cooking function. Place the air fry basket on the sheet pan when air frying foods that drip, such as marinated ingredients like chicken wings and steak.
When do I use the SearPlate?
The SearPlate can be used in the bottom rails with any cooking function. The SearPlate is multifunctional and can be used as a cookie sheet, baking tray, or sheet pan. Note that, for Dual Heat Functions (Sear Crisp, Rapid Bake, Griddle, Fresh Pizza, and Frozen Pizza), it is required to preheat the SearPlate. The SearPlate can also be used in the bottom rails to catch drippings when cooking in the air fry basket or wire rack.
What is the temperature range for each function?
The air temperature range varies depending on the function:
• AIR FRY: 250°F–450°F
• AIR ROAST: 250°F–450°F
• BROIL: 400°F (Lo) or 450°F (Hi)
• BAKE: 250°F–450°F
• TOAST: 450°F
• BAGEL: 450°F
• DEHYDRATE: 100°F–200°F (not included on all models)
• REHEAT: 100°F–450°F (not included on all models)
• SEAR CRISP: 250°F–500°F
• RAPID BAKE: 250°F–450°F
• GRIDDLE: 300°F–450°F (not included on all models)
• FRESH PIZZA: 250°F–500°F
• FROZEN PIZZA: 250°F–500°F
What are the timer increments?
The timer increments vary depending on the function:
• AIR FRY: 1-minute increments up to 1 hour
• AIR ROAST: 1-minute increments up to 2 hours
• BROIL: 30-second increments up to 30 minutes
• BAKE: 1-minute increments up to 2 hours
• TOAST: Total time ranging from 30 seconds to 10 minutes in increments adjusted by the shade level/slice settings
• BAGEL: Total time ranging from 30 seconds to 10 minutes in increments adjusted by the shade level/slice settings
• DEHYDRATE: 15-minute increments up to 12 hours (not included on all models)
• REHEAT: 1-minute increments up to 2 hours (not included on all models)
• SEAR CRISP: 1-minute increments up to 2 hours
• RAPID BAKE: 1-minute increments up to 2 hours
• GRIDDLE: 1-minute increments up to 30 minutes
• FRESH PIZZA: 1-minute increments up to 2 hours
• FROZEN PIZZA: 1-minute increments up to 2 hours
How do I know if the unit is on?
When the unit is powered on, the digital display will light up and scroll through all functions. The light will then stop on the selected function.
Do I need to add preheating time when setting a cook time?
The unit will automatically preheat when using Sear Crisp, Rapid Bake, Griddle, Fresh Pizza, Frozen Pizza, Air Fry, Air Roast, and Bake. Preheat is not necessary or available when using Broil, Toast, Bagel, Dehydrate, and Reheat.
How do I set the timer?
Press the TIME/SLICE button and use the START/STOP dial to set the time. If selected, you can change the time at any point during cooking by using the Time/Slice button.
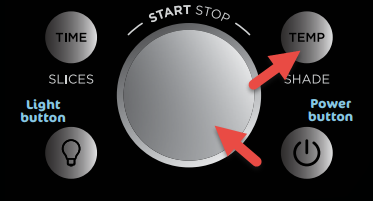
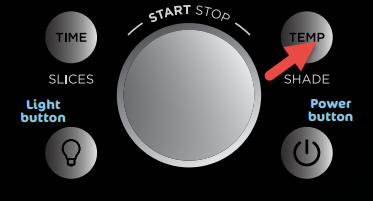
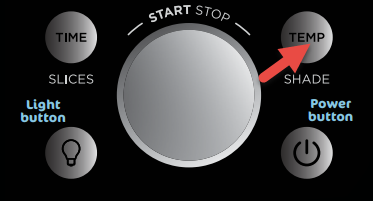
How do I set the temperature?
To set the oven air temperature, press the TEMP/SHADE button and use the START/STOP dial to set the desired temperature. You can change the temperature at any point during cooking by pressing the TEMP/SHADE button and using the START/STOP dial.
Can I adjust the cook time and/or temperature once the unit is running?
Yes, you can adjust the cook time and/or temperature at any point during cooking by pressing the TIME/SLICE and/or TEMP/SHADE button and using the START/STOP dial. Times and temperatures are always affected by the type of food, amount of food, whether accessories are placed correctly, and whether preheating instructions have been followed. Always keep an eye on your food while cooking.
What is the difference between the Toast and Bagel functions?
The Toast function is specifically programmed to toast bread, while the Bagel function is specifically programmed to toast bagels. Both functions have been pre-programmed to take into account the thickness and standard cook times of bread, bagels, and muffins.
Can I use the sheet pan instead of the air fry basket with the Air Fry function?
Yes, but crispiness results may vary.
Can I use the SearPlate instead of the air fry basket with the Air Fry function?
Yes, but flipping ingredients during cooking is required, and levels of crispiness may vary.
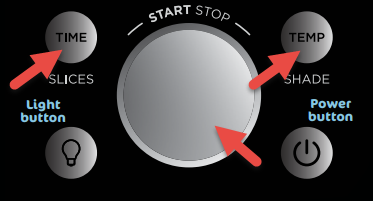
Can I restore the unit to its default settings?
Yes, to restore the oven’s default settings for each function, press the TIME/SLICE and TEMP/SHADE buttons simultaneously for 5 seconds. The oven will remember the last setting used for each function, even if you unplug it.
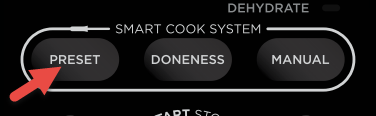
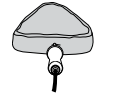
How do I use the Smart Thermometer using the PRESET option?
- Make sure thermometer jack is free of any residue and the cord is free of knots before plugging it into the jack
- Remove the thermometer from storage, then unwind the cord wrap to remove the thermometer on the right side of the unit.
- Plug the thermometer into the jack. Push firmly on the plug until it cannot go into the jack any further and you hear the plug click into place.
-
The thermometer icon on the display will illuminate once the thermometer is plugged in. The thermometer mode is enabled by pressing the PRESET button.
- Select the desired cook function (ex. Sear Crisp) and change cook temperature accordingly
- Press PRESET and rotate dial to select desired food type and the DONENESS button to set the internal doneness of your food.
-
Place the accessory required for your selected cook function in the unit and close the door. Press START/STOP dial to begin preheating.
-
While the unit is preheating, insert the thermometer horizontally into the center of the thickest part of the protein.
- Once the unit beeps to signify it is preheated, place the food onto the SearPlate on bottom rails.
-
Press TEMP button to view time elapsed and set oven temperature. NOTE: there is no need to set a cook time as the unit will automatically turn off the heating element and alert you once the food has finished cooking.
How do I use the Smart Thermometer using the MANUAL option?
- Make sure thermometer jack is free of any residue and the cord is free of knots before plugging it into the jack
- Remove the thermometer from storage, then unwind the cord wrap to remove the thermometer on the right side of the unit.
- Plug the thermometer into the jack. Push firmly on the plug until it cannot go into the jack any further and you hear the plug click into place.
-
The thermometer icon on the display will illuminate once the thermometer is plugged in. The thermometer mode is enabled by pressing the MANUAL button.
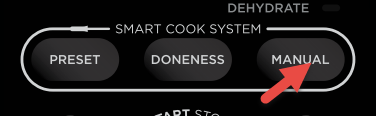
- Select the desired cook function (ex. Sear Crisp) and change cook temperature accordingly.
- Press MANUAL and rotate the dial to select internal temperature for doneness of your food (in degree F). Refer to the instruction booklet for recommended internal cook temperatures.
-
Place the accessory required for your selected cook function in the unit and close the door. Press START/STOP dial to begin preheating.
- While the unit is preheating, insert the thermometer horizontally into the center of the thickest part of the protein.
- Once the unit beeps to signify it is preheated, place the food onto the Sear Plate on bottom rails.
-
Press TEMP button to view the time elapsed and set oven temperature. NOTE: there is no need to set a cook time as the unit will automatically turn off the heating element and alert you once the food has finished cooking.
Why is the oven temperature lower than the display temperature?
The oven may still be heating up to the target temperature. The time it takes for your unit to heat up to the target temperature will vary based on what kind of food you are cooking, how much food you are cooking, the function you are using, and the cook time/temp. When the oven is opened, heat escapes, which may affect an external thermometer’s reading of the oven temperature.
This may also happen because, for some cook functions, the oven has a built-in temperature offset to mimic traditional oven baking. This offset does not impact cooking quality.
Do I need to adjust the cook times and temperatures of traditional oven recipes?
You can follow traditional recipes and package instructions with the Bake function. When preparing traditional oven recipes using the Sear Crisp, Quick Bake, Griddle, Pizza, Frozen Pizza, Air Fry, and Air Roast functions, food will cook faster than instructed on packages or in traditional recipes. Always keep an eye on your food while cooking.
Product-Related Questions
What is the internal capacity of the oven?
The internal capacity of the oven is 0.62 cubic feet; 13"L x 13"D x 4.05"H.
Is the air fry basket nonstick?
No. To minimize sticking, spray the air fry basket with cooking spray.
What is the capacity of the air fry basket?
The air fry basket holds up to 4 pounds of food.
Is the sheet pan nonstick?
No, the sheet pan is enamel. We recommend lining the sheet pan with aluminum foil/parchment paper or lightly coating with recommended oils for easy clean up after cooking. Soak the sheet pan in warm, soapy water overnight for stuck-on grease.
Is the SearPlate nonstick?
Yes. The SearPlate has a nonstick ceramic coating.
What is the wattage?
This unit is 1800 watts.
What is the exterior of the unit made of?
The outside of the unit is stainless steel.
Will the outside of the unit get hot?
The outside of the unit and glass window will heat up during cooking, but the control panel and door handle will remain cool to touch.
What is the warranty?
1-year limited warranty.
How long is the power cord?
The power cord is approximately 34 inches long.
Is it safe to put the air fry basket/sheet pan/sear plate on my countertop?
Place the air fry basket, sheet pan or Sear Plate on heat-safe surfaces only, and use caution when handling, as they will get hot during cooking. You can place accessories on top of the oven. Use a hot pad or trivet to prevent sliding.
How do I store my Ninja Foodi?
- Once the unit has cooled down, hold handles on each side of the unit.
- Lift and flip unit onto its side.
- Leave the unit in the upright position when storing.
Why is the fan running after I am done cooking?
The unit's fan will automatically turn on during all cook functions to keep the control panel cool to the touch during cooking. The fan will turn off when the control panel is at an acceptable temperature, even if this is after the cook cycle has completed.
Can I use my own pans and dishes in the oven?
Yes, as long as they are oven safe up to 500°F and fit in the unit without touching on the heating elements or preventing the door from closing.
What is the unit's amperage?
The amperage of the unit is approximately 15A. To avoid tripping a circuit breaker, make sure the unit is the only appliance plugged into an outlet on a 15 amp circuit breaker when in use.
Cleaning/Maintenance
How do I clean the unit?
Everyday Cleaning:
- Unplug the unit from the wall outlet and allow it to cool down before cleaning.
- Empty the crumb tray by sliding it out of the oven when the oven is in the flipped-down position.
- To clean the exterior of the main unit and the control panel, wipe clean with a damp cloth.
- The unit interior and crumb tray should be cleaned after every use or grease build up will be harder to clean overtime.
Deep Cleaning:
- Allow the unit to cool down then unplug the unit from the outlet before cleaning.
- Remove all accessories from the unit, including the crumb tray, and wash separately. Use a non-abrasive cleaning brush to wash the air fry basket more thoroughly. Soak accessories overnight in hot, soapy water. The air fry basket and wire rack can be put in the dishwasher, but may wear more quickly over time.
- Use warm, soapy water and a soft cloth to wash the oven’s interior. DO NOT
use abrasive cleaners, scrubbing brushes, or chemical cleaners, as they will damage the oven. - To prolong use of accessories, hand-wash with warm, soapy water.
- Thoroughly dry all parts before placing them back in the oven.
Which accessories are dishwasher safe?
Dishwasher-Safe Accessories but Hand-Wash Recommended: Air Fry Basket Wire Rack
Non-Dishwasher-Safe Accessories: Crumb Tray Sheet Pan
Display Messages
Why does the HOT indicator appear on the display?
This indicator appears when the unit is hot and will turn off when the oven is cool enough to be flipped up for storage or cleaning.
Why does "FLIP" appear on the display?
Flip will appear when the unit is cool enough to flip up for storage or cleaning.
Cooking
Do I have to rotate the air fry basket while cooking?
Yes. It is important to rotate your food for consistent browning and crispiness. For best results, follow the recipe or cooking chart to see how often you should rotate ingredients while cooking.
Do I need to add oil when air frying?
Although oil is not required, we recommend that you start with one tablespoon and adjust for personal preference or otherwise that you use the amount of oil suggested in your recipe.
Can I use parchment paper?
Yes. Parchment paper can be used in the unit the same way that you would use it in your conventional oven. Make sure the parchment paper is not touching the interior side walls or top heating elements.
Can I use aluminum foil?
Yes. Use aluminum foil on the SearPlate or wire rack for easy cleaning after cooking. Make sure the aluminum is not touching the top heating elements. Do not wrap the crumb tray in aluminum foil.
Do I need to defrost frozen foods before air frying them?
It depends on the food. Follow package instructions.
Why is my unit generating smoke?
There may be grease on the heating elements. Ensure you are placing the SearPlate in the bottom rails when using the air fry basket or wire rack, which will stop food from dropping onto the bottom heating elements. Also ensure that no food is directly contacting the top heating elements or the top of the cooking cavity.
If problem persists, run a Toast cycle on shade 7 with accessories removed; this will burn off any additional grease on the heating elements causing smoke.
The wrong cooking oil may have been used. Ensure that you are using one of the recommended oils: Canola, Refined Coconut, Avocado, Grapeseed, and Vegetable. Not recommended: Olive Oil, Butter, Margarine.
The marinade may have been heated for too long. If you are using a marinade, ensure that you are applying it halfway through the cooking cycle; applying it earlier will result in smoking/burning of the marinade.
The temperature may be set too high for the food getting cooked. Cook any fatty foods at 400°F or lower.
If units are smoking due to fatty foods, incorrect oil, lack of cleaning, or marinade added earlier than halfway through the cooking cycle, they should not be replaced.
Why is steam coming out from the oven door?
This is normal. The door is vented to release steam created by foods with a high moisture content.
Why is water dripping onto the counter from under the door?
This is normal. The condensation created by foods with a high moisture content (such as frozen breads) may run down the inside of the door and drip onto the counter.
Why is my toast burnt or underdone?
- Make sure you have set the correct slice number and shade level. The oven has preset times that correlate with each setting. If the slice number does not match the number of slices of bread in the oven, results may vary from the desired shade level.
- As the unit becomes greasier/dirtier, the Toast/Bagel functions may become less effective, making them take longer than normal for desired results. Make sure to clean unit and accessories from grease after each use.
- If bread is frozen or stale, this may affect toast time.
- Ensure you placing the slices on a wire rack in the middle rack position.
- For drier or stale bread, adjust shade lower than your standard setting.
For freshly baked, whole wheat, and frozen breads, adjust the shade higher than your standard setting. - For thick-cut pieces, adjust the shade higher than your standard setting. Be sure to slice bread evenly for consistent toasting. Very thin slices may burn. Use the lowest shade selection and monitor while toasting.
Why is the oven not reaching the selected temperature at the end of the preheat cycle?
At the completion of the preheat cycle, the unit will not reach the target cook temperature but will be hot enough to start cooking your ingredients. As the cook cycle progresses, the oven will continue to heat up and cook your food to doneness. This is a convection oven, which can cook more quickly than a traditional oven. Our oven is designed with an algorithm that ensures temperature and time settings work with traditional recipes.
Why does the unit sound like it's still running even though the power is off?
The cooling fan may continue to run even after the unit has been turned off. This is normal and should not be a source of concern. The cooling fan will stop after the temperature of the unit reaches below 95°F (35°C).
Should I add my ingredients before or after preheating?
For Sear Crisp, Quick Bake, Griddle, Pizza and Frozen Pizza, preheating the SearPlate is required before adding ingredients. If you do not preheat the SearPlate, food may be cooked improperly.
For Air Roast, Air Fry, and Bake, preheating the SearPlate or accessories is not required but adding ingredients before preheating completes may impact cooking performance.
Toast, Bagel, Broil, Reheat and Dehydrate do not have preheat.
Why is my food undercooked or overcooked?
This unit cooks faster than a traditional oven. Refer to the Inspiration Guide for guidance.
Do not add food until recommended preheat time is complete. For best results, check progress throughout cooking, and remove food if desired level of doneness has been achieved. Remove food immediately after the cook time is complete to avoid overcooking.
For Sear Crisp, Quick Bake, Griddle, Pizza, and Frozen Pizza, make sure to use the SearPlate in the bottom rails so the oven can read temperatures properly. If it is not inserted in the bottom rails, this may cause undercooking or overcooking.